老男孩教育专注IT教育10余年,只培养IT技术精英
 全国免费咨询电话(渠道合作):400-609-2893




运维工作太忙?一文详解Ansible自动化运维,轻松提升工作效率(下)!
 老男孩IT教育
 技术博客
技术博客
 2023年6月13日 18:27
Ansible是新出现的自动化运维工具,基于Python开发,集合了众多运维工具的优点,实现了批量系统配置、批量程序部署、批量运行命令等功能。接下来我们接着上篇文章,继续为大家介绍。
Ansible是新出现的自动化运维工具,基于Python开发,集合了众多运维工具的优点,实现了批量系统配置、批量程序部署、批量运行命令等功能。接下来我们接着上篇文章,继续为大家介绍。
阅读这篇文章之前,推荐阅读:运维工作太忙?一文详解Ansible自动化运维,轻松提升工作效率(上)!
系统管理模块
1)mount模块
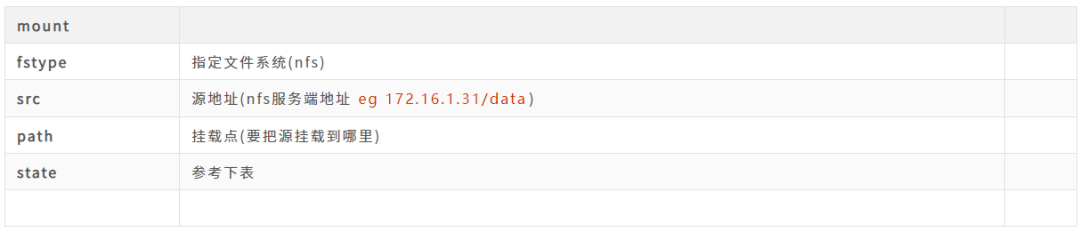
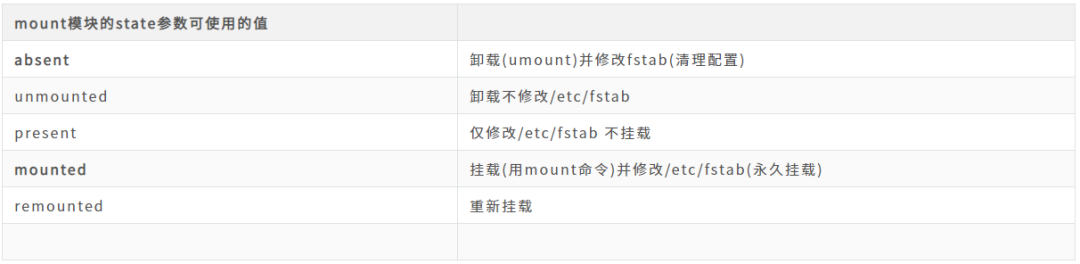
案例01-挂载案例
web01把 nfs共享的目录/data目录挂载到 web01的/upload_video

步骤01_web01上面创建挂载点/upload_video
ansible web  -m file  -a 'path=/upload_video   state=directory'


步骤02_挂载nfs

 ansible web -m mount   -a 'fstype=nfs src="172.16.1.31:/data"  path=/upload_video  state=mounted '
 ansible web -a 'df -h'
 ansible web -a 'tail -2 /etc/fstab'
2)cron定时任务模块
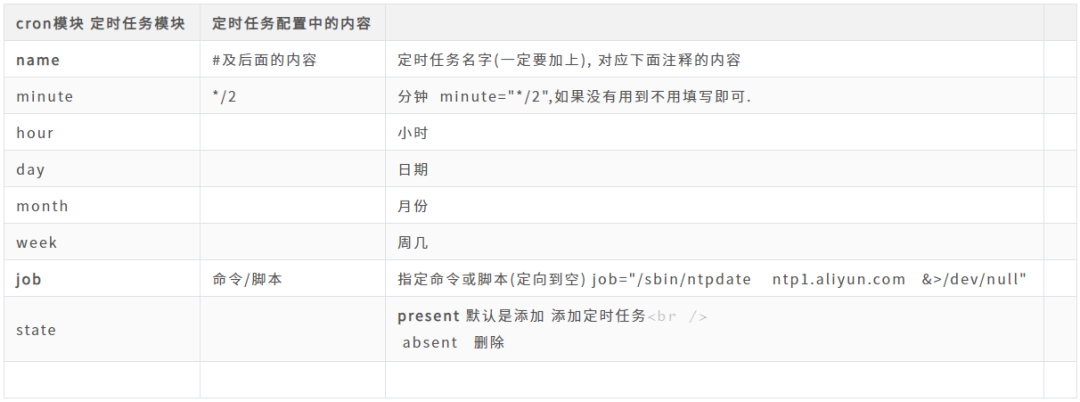
案例01-添加自动同步时间的定时任务
#1. sync time lidao996
*/2 * * * * /sbin/ntpdate ntp1.aliyun.com  &>/dev/null

步骤01_备份数据
ansible all  -a  'cp /var/spool/cron/root  /tmp/'
ansible all  -a  'ls -l /tmp/root'
ansible all  -a  'crontab -r'

步骤02_书写定时任务
ansible  all  -m cron -a 'name="sync time by lidao996 20221111"  minute="*/2"  job="/sbin/ntpdate ntp1.aliyun.com  &>/dev/null" state=present'
用户管理模块
1)user
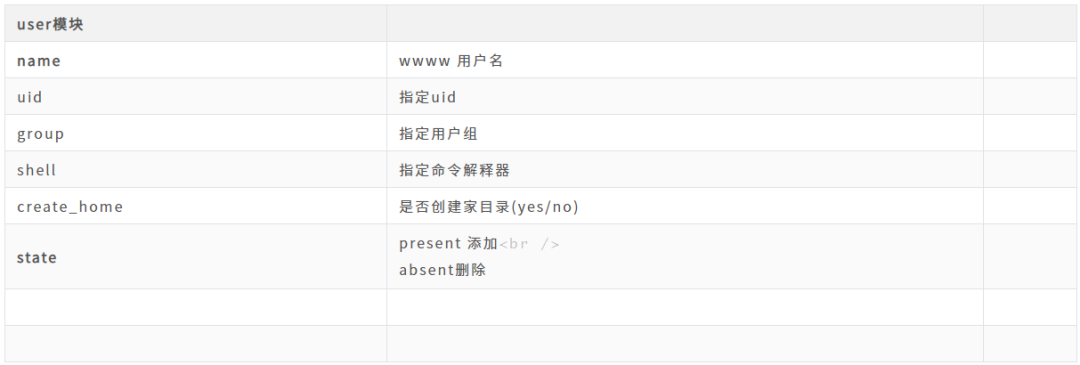
案例01-创建用户lidao996
[root@m01 ~]# ansible web -m user -a 'name=lidao996'
案例02-创建虚拟用户tengine,指定uid为10086
useradd -u 10086   -s /sbin/nologin -M   tengine
[root@m01 ~]# ansible  web -m  user  -a  'name=tengine uid=10086 shell=/sbin/nologin create_home=no state=present'
172.16.1.7 | CHANGED => {
    "ansible_facts": {
        "discovered_interpreter_python": "/usr/bin/python"
    },
    "changed": true,
    "comment": "",
    "create_home": false,
    "group": 10086,
    "home": "/home/tengine",
    "name": "tengine",
    "shell": "/sbin/nologin",
    "state": "present",
    "system": false,
    "uid": 10086
}
[root@m01 ~]# ansible  web -a 'id tengine'
172.16.1.7 | CHANGED | rc=0 >>
uid=10086(tengine) gid=10086(tengine) groups=10086(tengine)
[root@m01 ~]# ansible  web -a 'grep tengine /etc/passwd'
172.16.1.7 | CHANGED | rc=0 >>
tengine:x:10086:10086::/home/tengine:/sbin/nologin
2)group模块
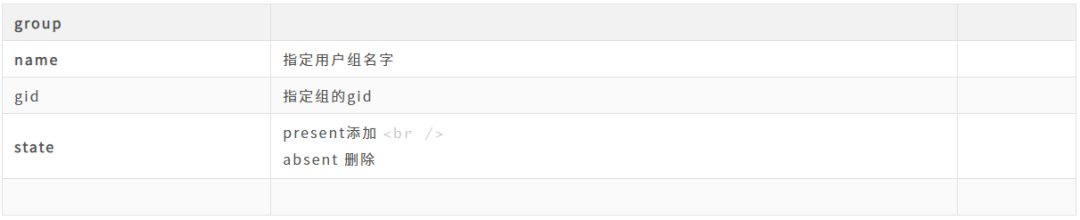
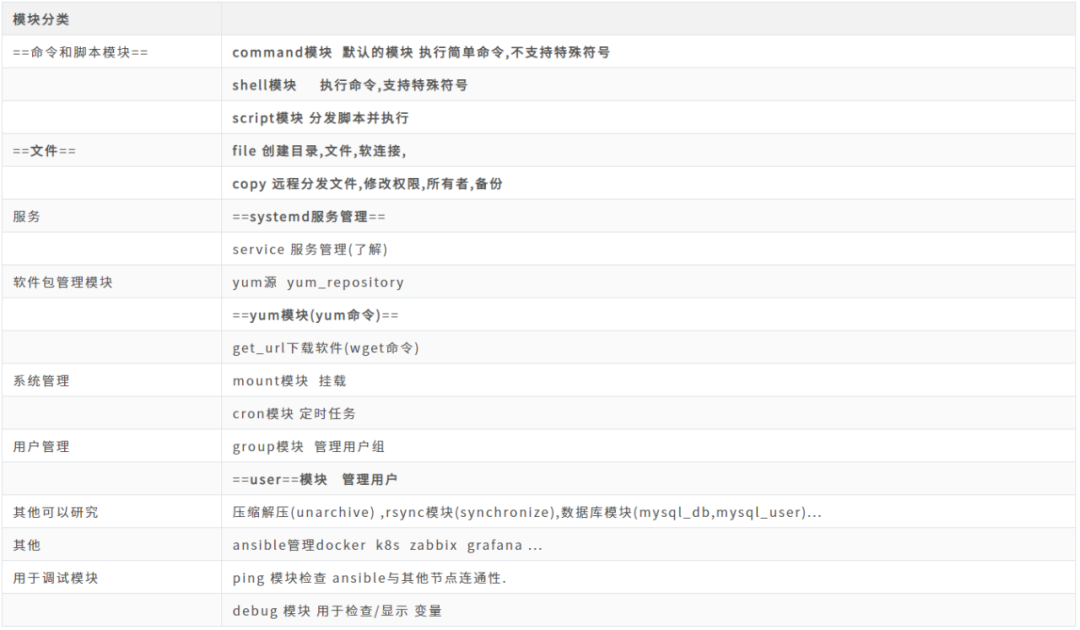
模块总结
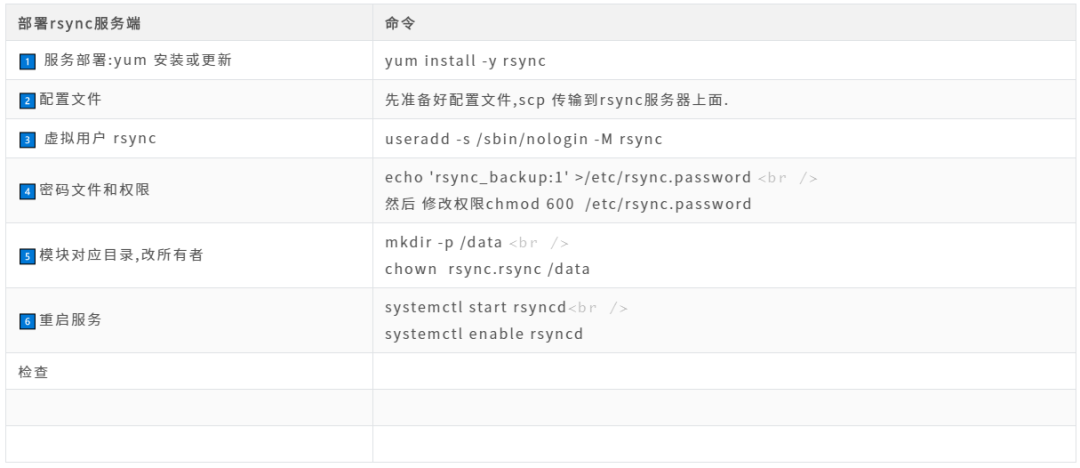
Ansible模块实战-部署rsync服务端
##rsyncd.conf start##
##rsyncd 20221111
fake super = yes
uid = rsync
gid = rsync
use chroot = no
max connections = 200
timeout = 300
pid file = /var/run/rsyncd.pid
lock file = /var/run/rsync.lock
log file = /var/log/rsyncd.log
ignore errors
read only = false
list = false
hosts allow = 172.16.1.0/24
#hosts deny = 0.0.0.0/32
auth users = rsync_backup
secrets file = /etc/rsync.password
[data]
comment = "backup dir by oldboy lidao996"
path = /data
[backup]
comment = "backup dir by oldboy lidao996"
path = /backup
[nfsbackup]
comment = 'nfsbackup dir by lidao996'
path = /nfsbackup
根据命令及对应操作选择ansible模块
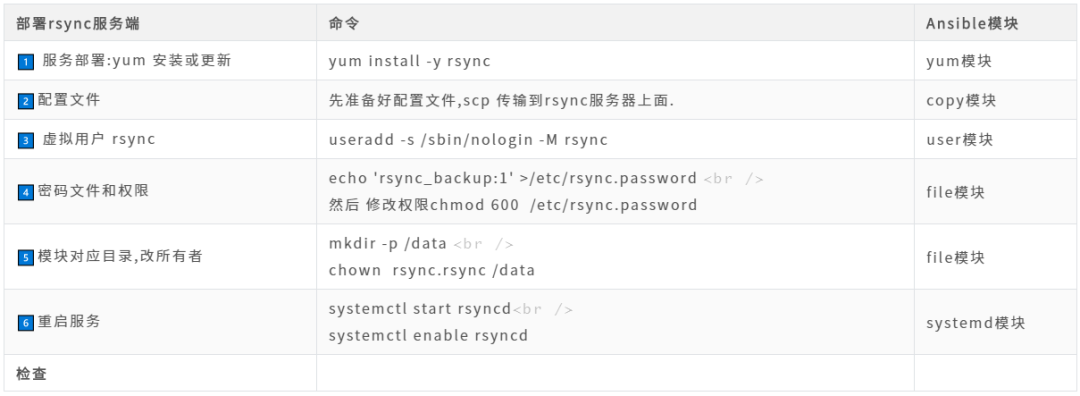
根据选择的模块实现对应的功能
1)服务部署:yum安装或更新
ansible backup -m yum -a 'name=rsync state=lastest'
2)配置文件分发
mkdir -p /server/ans/pro-rsync
准备配置文件存放在  上面目录中 rsyncd.conf
ansible backup  -m copy  -a 'src=/server/ans/pro-rsync/rsyncd.conf  dest=/etc/rsyncd.conf backup=yes'
3)虚拟用户 rsync
ansible backup -m user -a 'name=rsync shell=/sbin/nologin create_home=no state=present'
4)密码文件和权限
创建文件
ansible backup -m file -a 'path=/etc/rsync.password   mode=600 state=touch'
增加
ansible backup -m lineinfile   -a 'path=/etc/rsync.password line="rsync_backup:1"'
5)模块对应目录,改所有者
ansible backup -m file -a 'path=/data owner=rsync group=rsync state=directory'
6)重启服务
ansible backup -m systemd -a 'name=rsyncd enabled=yes state=started'
7)命令行测试
[root@m01 /server/ans/pro-rsync]# rsync -av /etc/hostname rsync_backup@172.16.1.31::data
8)指定hosts文件的位置
[root@m01 /server/ans/pro-rsync]# tree /server/ans/pro-rsync/
/server/ans/pro-rsync/
├── hosts
└── rsyncd.conf

0 directories, 2 files
[root@m01 /server/ans/pro-rsync]# ansible -i hosts  all  -m ping
Ansible-playbook(剧本)
ansible ad-hoc vs playbook区别

playbook vs shell脚本

Playbook剧本极速使用指南
剧本格式叫yaml格式yml
缩进,不要用tab键,空格
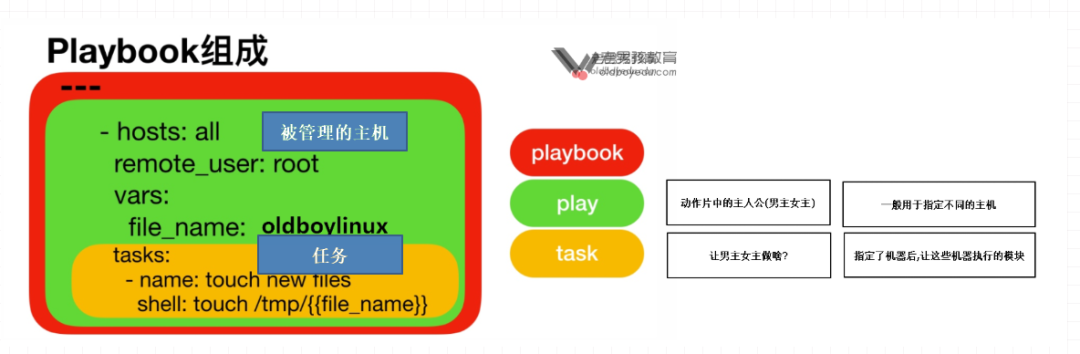
核心格式剧本中所有的内容要对齐
对齐的时候不能使用tab键
只能使用空格,2个空格
hosts用于指定在哪些主机执行指令
tasks: 用于对于这些主机,运行什么模块及选项
案例01-在所有机器的/tmp下面创建lidao.txt
[root@m01 /server/ans/playbook]# cat 01.touch.yml
- hosts: all
  vars:
    filename: lidao.txt
  tasks:
    - name: touch  file
      shell: touch /tmp/{{ filename  }}
 cp /etc/ansible/hosts .
 ansible-playbook -i hosts 01.touch.yml


[root@m01 /server/ans/playbook]# tree /server/ans/playbook/
/server/ans/playbook/
├── 01.touch.yml
└── hosts

0 directories, 2 files


- hosts: all
  tasks:
    - name: touch  file
      shell: touch /tmp/lida.txt
案例02-添加定时同步时间的定时任务
原始命令行的ansible命令:
ansible  all  -m cron -a 'name="sync time by lidao996 20221111"  minute="*/2"  job="/sbin/ntpdate ntp1.aliyun.com  &>/dev/null" state=present'
ansible -i hosts all  -a 'crontab -l'
修改为剧本之后
#简单粗暴版本
---
- hosts: all
  tasks:
    - name: add cron sync time
      cron: name="sync time by lidao996 20221111"  minute="*/2"  job="/sbin/ntpdate ntp1.aliyun.com  &>/dev/null" state=present

#格式优化后
---
- hosts: all
  tasks:
    - name: add cron sync time
      cron:
        name: "sync time by lidao996 20221111"
        minute: "*/2"
        job: "/sbin/ntpdate ntp1.aliyun.com  &>/dev/null"
        state: present
在剧本中使用模块和选项,选项最好是一行一个选项,选项后面跟着冒号,选项要对其与缩进。
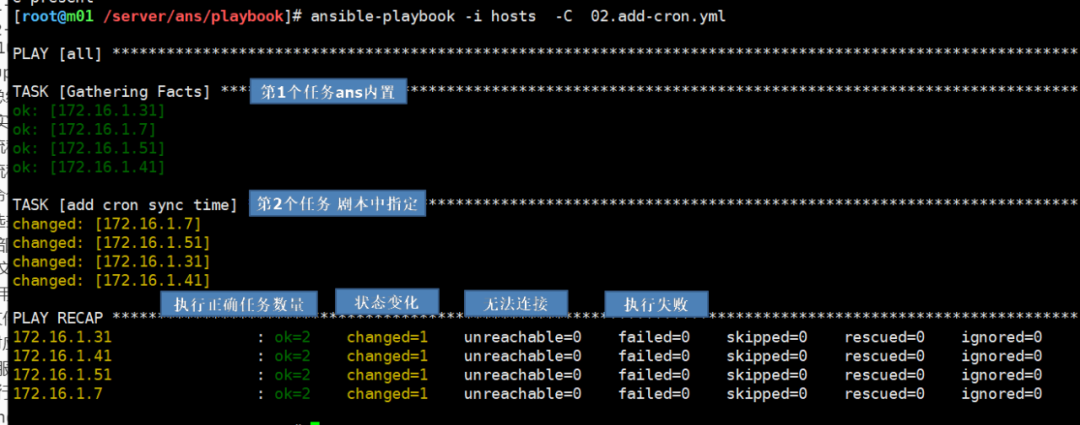
[root@m01 /server/ans/playbook]# ansible -i hosts  all   -a 'crontab -l'
172.16.1.7 | CHANGED | rc=0 >>
#Ansible: sync time by lidao996 20221111
*/2 * * * * /sbin/ntpdate ntp1.aliyun.com  &>/dev/null
172.16.1.31 | CHANGED | rc=0 >>
#Ansible: sync time by lidao996 20221111
*/2 * * * * /sbin/ntpdate ntp1.aliyun.com  &>/dev/null
172.16.1.41 | CHANGED | rc=0 >>
#Ansible: sync time by lidao996 20221111
*/2 * * * * /sbin/ntpdate ntp1.aliyun.com  &>/dev/null
172.16.1.51 | CHANGED | rc=0 >>
#Ansible: sync time by lidao996 20221111
*/2 * * * * /sbin/ntpdate ntp1.aliyun.com  &>/dev/null
案例03-企业案例-批量下载安装zabbix-agent2-6.0客户端并启动
---
- hosts: all
  tasks:
    - name: 1. download zabbix agent2 rpm
    get_url:
        ur :  https://mirrors.tuna.tsinghua.edu.cn/zabbix/zabbix/6.0/rhel/7/x86_64/zabbix-agent2-6.0.0-1.el7.x86_64.rpm
        dest: /tmp/
        validate_certs: no

    - name: 2. install  zabbix agent2 rpm
      yu :
        name: /tmp/zabbix-agent2-6.0.0-1.el7.x86_64.rpm
        state: installed

    - name: 3. start    zabbix agent2 service
      s stemd:
        name: zabbix-agent2
        enabled: yes
        state: started
案例04-部署rsync服务端(剧本)
### 1) 服务部署:yum 安装或更新
ansible backup  -m yum  -a 'name=rsync  state=lastest'
### 2) 配置文件分发
mkdir -p /server/ans/pro-rsync
准备配置文件存放在  上面目录中 rsyncd.conf
ansible backup  -m copy  -a 'src=/server/ans/pro-rsync/rsyncd.conf  dest=/etc/rsyncd.conf backup=yes'
### 3) 虚拟用户 rsync
ansible backup -m user -a 'name=rsync shell=/sbin/nologin create_home=no state=present'
### 4)密码文件和权限
创建文件
ansible backup -m file -a 'path=/etc/rsync.password   mode=600 state=touch'
增加
ansible backup -m lineinfile   -a 'path=/etc/rsync.password line="rsync_backup:1"'
### 5)模块对应目录,改所有者
ansible backup -m file -a 'path=/data   owner=rsync group=rsync  state=directory'
### 6) 重启服务
ansible backup -m  systemd -a 'name=rsyncd enabled=yes state=started'
[root@m01 /server/ans/playbook]# ansible -i hosts backup -m ping
172.16.1.41 | SUCCESS => {
    "ansible_facts": {
        "discovered_interpreter_python": "/usr/bin/python"
    },
    "changed": false,
    "ping": "pong"
}
[root@m01 /server/ans/playbook]# cat 05-backup-resyncd.yml
---
- hosts: backup
  tasks:
#   - name: 1) 服务部署:yum 安装或更新
#     yum:
#       name: rsync
#       state: latest

    - name: 2) 配置文件分发
      copy:
        src: /server/ans/playbook/rsyncd.conf
        dest: /etc/rsyncd.conf
        backup: yes

    - name: 3) 虚拟用户 rsync
      user:
        name: rsync
        shell: /sbin/nologin
        create_home: no
        state: present

    - name: 4) 密码文件和权限
      lineinfile:
        path: /etc/rsync.password
        mode: 0600
        line: "rsync_backup:1"
        create: yes

    - name: 5) 模块对应目录,改所有者
      file:
        path: /data/
        owner: rsync
        group: rsync
        state: directory

    - name: 6) 重启服务
      systemd:
        name: rsyncd
        enabled: yes
        state: started
案例05-部署nfs服务端全流程
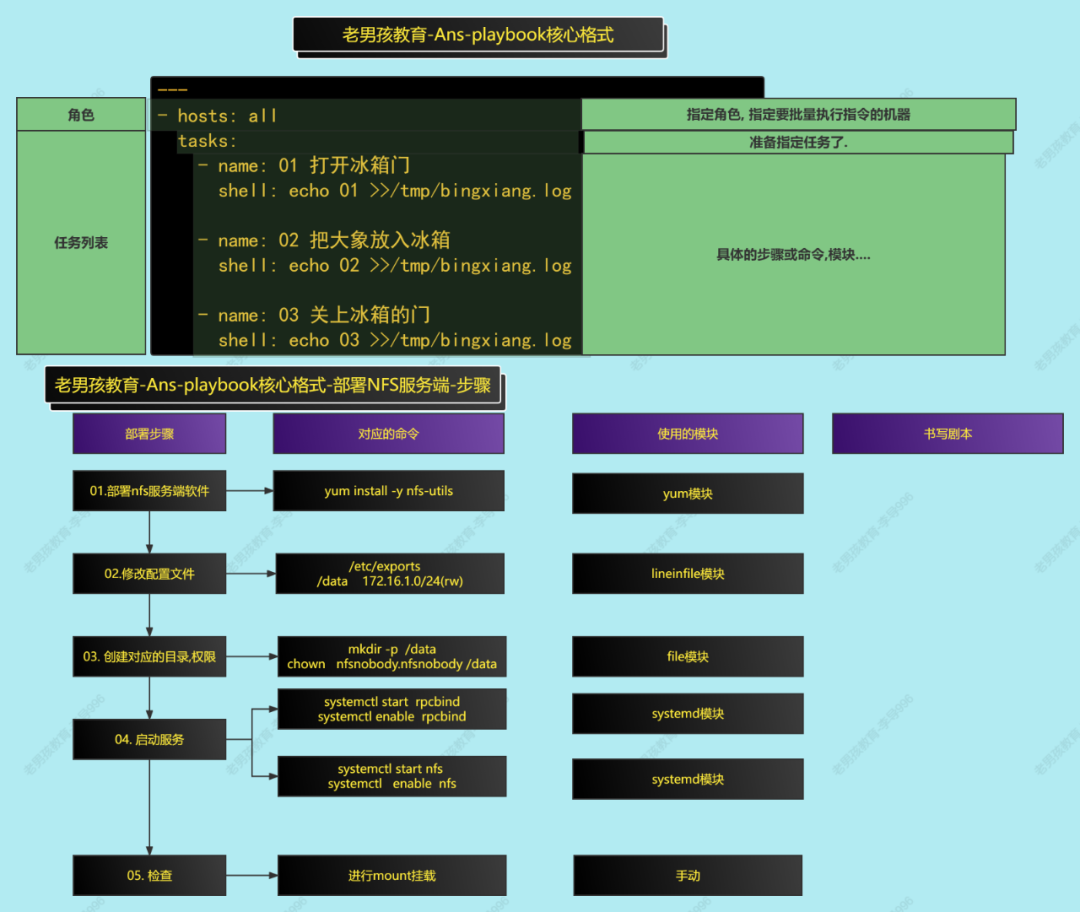
Ansible变量系列
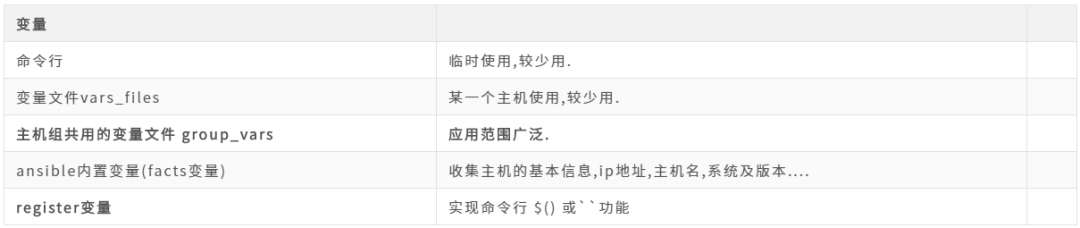
变量详解
1)vars、vars_files、group_vars
[root@m01 /server/ans/playbook]# cat 07.vars_dir.yml
---
- hosts: all
  vars:
    dir_name: /oldboy_lidao
    file_name: lidao996.icu
  tasks:
    - name: 01. mkdir
      file:
        path: "{{ dir_name }}"
        state: directory

    - name: 02. touch
      file:
        path: "{{ dir_name }}/{{ file_name }}"
        state: touch
把变量存放到一个文件中. 剧本比较大的时候.
[root@m01 /server/ans/playbook]# cat 07.vars_dir.yml
---
- hosts: all
  vars:
    dir_name: /oldboy_lidao
    file_name: lidao996.icu
  tasks:
    - name: 01. mkdir
      file:
        path: "{{ dir_name }}"
        state: directory

    - name: 02. touch
      file:
        path: "{{ dir_name }}/{{ file_name }}"
        state: touch
创建一个变量文件,给某个组共用
用法:需要创建一个group_vars目录.
    目录下面创建以主机组命名的目录.
    存放变量文件vars.yml

group_vars/  目录
    lb/vars.yml  #存放lb组的变量
    web/vars.yml #存放web组的变量
    data/vars.yml #存放xxx组的变量
    all/vars.yml  #所有主机共用的变量
案例01-根据不同的主机组创建对应的目录
group_vars/  目录
    web/vars.yml #存放web组的变量
    data/vars.yml #存放xxx组的变量
    all/vars.yml  #所有主机共用的变量
web服务器创建 /app/code/目录
dir_name: /app/code/
data服务端创建 /data/目录
dir_name: /data/

#参考:

##变量文件内容

[root@m01 /server/ans/playbook]# cat group_vars/data/vars.yml
dir_name: /datav2/
[root@m01 /server/ans/playbook]# cat group_vars/web/vars.yml
dir_name: /app/code/
[root@m01 /server/ans/playbook]# tree group_vars/
group_vars/
├── data
│   └── vars.yml
└── web
    └── vars.yml

3 directories, 3 files
#剧本内容
[root@m01 /server/ans/playbook]# cat  09.vars_group_vars_dir.yml
- hosts: all
  tasks:
    - name: 根据主机创建不同的目录
      file:
        path: "{{ dir_name }}"
        state: directory
案例02-使用group_vars的all组定义变量
[root@m01 /server/ans/playbook]# tree group_vars/
group_vars/
├── all
│   └── vars.yml
├── data
│   └── vars.yml
└── web
    └── vars.yml

3 directories, 3 files
[root@m01 /server/ans/playbook]# cat group_vars/all/vars.yml
dir_name_code: /app/code/
dir_name_data: /data/
[root@m01 /server/ans/playbook]# cat 09.vars_group_vars_dir.yml
- hosts: all
  tasks:
    - name: 01 {{ dir_name_code }}
      file:
        path: "{{ dir_name_code }}"
        state: directory

    - name: 02 {{ dir_name_data }}
      file:
        path: "{{ dir_name_data }}"
        state: directory
剧本目录,目录结构

[root@m01 /server/ans/playbook]# tree
.
├── 01.touch.yml
├── 02.add-cron.yml
├── 03.add-cron-you.yml
├── 04.install-zabbix-agent2.yml
├── 05-backup-resyncd.yml
├── 06-nfs-server.yml
├── 07.vars_dir.yml
├── 08.vars_files_dir.yml
├── 09.vars_group_vars_dir.yml
├── group_vars
│   ├── all
│   │   └── vars.yml
│   ├── data
│   │   └── vars.yml
│   └── web
│       └── vars.yml
├── hosts
├── rsyncd.conf
└── vars.yml

4 directories, 15 files
变量基础定义小结

2)ansible-facts变量
facts变量说明== : ansible内置变量,执行剧本,有个默认的任务(task),收集每个主机的基本信息。
#查看 ansible facts变量内容
ansible  -i hosts  web    -m setup


常用fact变量
ansible_hostname               #主机名
ansible_memtotal_mb            #内存大小(总计) 单位mb
ansible_processor_vcpus        #cpu数量
ansible_default_ipv4.address   #默认的网卡ip eth0
ansible_distribution           #系统发行版本名字 CentOS  Ubuntu  Debian ...
ansible_processor_cores        #核心总数
ansible_date_time.date         #当前时间 年-月-日
案例01-系统巡检-获取所有机器的基础信息保存到/tmp/主机名命名文件中
步骤:
01.创建文件
02.写入内容
[root@m01 /server/ans/playbook]# cat  10.vars_sys_info.yml
---
- hosts: all
  tasks:
    - name: 创建文件并写入系统基本信息
      lineinfile:
        path: /tmp/{{ ansible_hostname }}
        create: yes
        line: "主机名: {{ ansible_hostname  }}\n
               ip地址:  {{ ansible_default_ipv4.address }}\n
               内存总计: {{ ansible_memtotal_mb }}"
- hosts: all
  gather_facts: no
  vars:
    dir_name: /oldboy_lidao
    file_name: lidao996.icu
  tasks:
    - name: 01. mkdir
      file:
        path: "{{ dir_name }}"
        state: directory

    - name: 02. touch
      file:
        path: "{{ dir_name }}/{{ file_name }}"
        state: touch
3)ansible-register变量
创建压缩包压缩包名字包含时间,tar打包压缩,date获取时间。
tar zcf /tmp/etc-`date +%F`.tar.gz /etc/
案例01-创建以主机名命名文件/opt/主机名
步骤:
01.获取主机名:hostname
02.创建文件,使用上一步的结果


register: 变量名字  #这个变量的内容,叫json格式.
register: hostname #json格式,只想要输出标准输出 stdout standard output 标准输出.
hostname.stdout #取出命令的结果 `hostname`


[root@m01 /server/ans/playbook]# cat 12.vars_register.yml
---
- hosts: all
  tasks:
    - name: 01.获取主机名
      shell: hostname
      register: hostname
    - name: 输出变量内容
      debug:
        msg: "{{ hostname  }}"


[root@m01 /server/ans/playbook]# cat   12.vars_register.yml
---
- hosts: all
  tasks:
    - name: 01.获取主机名
      shell: hostname
      register: hostname
    - name: 输出变量内容
      debug:
        msg: "{{ hostname.stdout  }}"
    - name: 02. 创建文件
      file:
        path: /opt/{{ hostname.stdout  }}
        state: touch
register变量输出结果
{
    "msg": {
        "changed": true,
        "cmd": "hostname",
        "delta": "0:00:00.008150",
        "end": "2022-04-14 12:32:14.587547",
        "failed": false,
        "rc": 0,                  #命令的返回值,0表示正确,非0错误.
        "start": "2022-04-14 12:32:14.579397",
        "stderr": "",             #错误信息
        "stderr_lines": [],
        "stdout": "backup02",     #这个最常用. 命令的结果,输出.
        "stdout_lines": [
            "backup02"
        ]
    }
}
register: hostname
hostname.stdout  #正常输出信息
hostname.rc      #取出返回值.
hostname.stderr  #取出错误信息.
Ansible-进阶-剧本调试方法

Debug模块

案例01-调试-nfs服务端部署剧本
[root@m01 /server/ans/playbook]# cat   13-debug-nfs-server.yml
---
- hosts: db
  tasks:
    - name: 01. 部署nfs服务端软件
      yum:
        name: nfs-utils
        state: installed

    - name: 02. 修改配置文件
      lineinfile:
        path: /etc/exports
        line: "/data    172.16.1.0/24(rw)"
        state: present
        backup: yes

    - name: 03. 创建对应的目录,权限
      file:
        path: /data/
        owner: nfsnobody
        group: nfsnobody
        state: directory
      register: file_jieguo

    - name: 输出,显示这个过程
      debug:
        msg: "{{ file_jieguo  }}"

    - name: 04. 启动服务-rpc服务
      systemd:
        name: rpcbind
        enabled: yes
        state: started

    - name: 05. 启动服务-nfs服务
      systemd:
        name: nfs
        enabled: yes
        state: started
tags标签
一般用于调试剧本,给剧本个每个task可以设置个标签
运行剧本的时候可以运行指定标签
运行剧本的时候排除某些标签
[root@m01 /server/ans/playbook]# cat  14-tags-nfs-server.yml
---
- hosts: db
  tasks:
    - name: 01. 部署nfs服务端软件
      yum:
        name: nfs-utils
        state: installed
      tags:
        - install

    - name: 02. 修改配置文件
      lineinfile:
        path: /etc/exports
        line: "/data    172.16.1.0/24(rw)"
        state: present
        backup: yes
      tags:
        - conf
        - conf_file

    - name: 03. 创建对应的目录,权限
      file:
        path: /data/
        owner: nfsnobody
        group: nfsnobody
        state: directory
      tags:
        - conf
        - conf_dir

    - name: 04. 启动服务-rpc服务
      systemd:
        name: rpcbind
        enabled: yes
        state: started
      tags:
        - start_srv

    - name: 05. 启动服务-nfs服务
      systemd:
        name: nfs
        enabled: yes
        state: started
      tags:
        - start_srv
运行指定的标签
ansible-playbook -i hosts    --tags conf  14-tags-nfs-server.yml
ansible-playbook -i hosts    --tags conf_file,conf_dir  14-tags-nfs-server.yml
运行剧本的时候排除指定的标签
ansible-playbook -i hosts --skip-tags install,conf_file 14-tags-nfs-server.yml
忽略错误
用于运行剧本的时候,强制让某个任务(模块)运行即使出错了,也不要中断我们的剧本。
[root@m01 /server/ans/playbook]# cat 15-ignore-nfs-server.yml
---
- hosts: db
  tasks:
    - name: 01. 部署nfs服务端软件
      yum:
        name: nfs-util
        state: installed
      ignore_errors: yes
      tags:
        - install

    - name: 02. 修改配置文件
      lineinfile:
        path: /etc/exports
        line: "/data    172.16.1.0/24(rw)"
        state: present
        backup: yes
      tags:
        - conf
        - conf_file

    - name: 03. 创建对应的目录,权限
      file:
        path: /data/
        owner: nfsnobody
        group: nfsnobody
        state: directory
      tags:
        - conf
        - conf_dir

    - name: 04. 启动服务-rpc服务
      systemd:
        name: rpcbind
        enabled: yes
        state: started
      tags:
        - start_srv

    - name: 05. 启动服务-nfs服务
      systemd:
        name: nfs
        enabled: yes
        state: started
      tags:
        - start_srv
Ansible-进阶应用
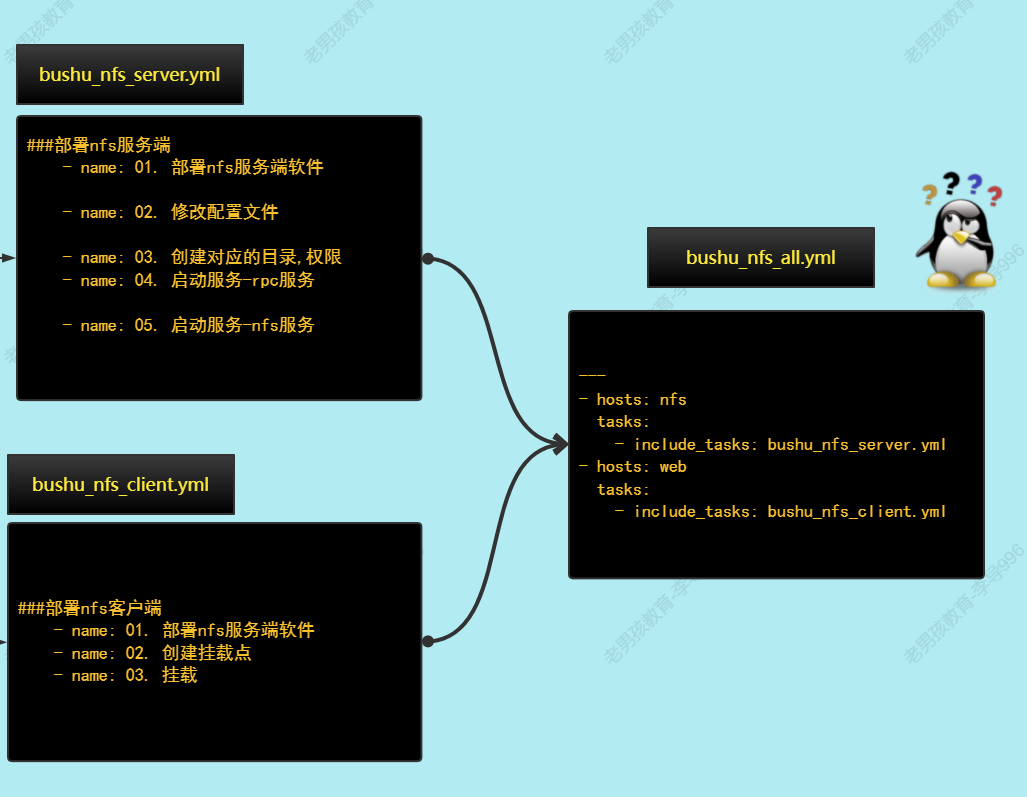
include文件包含:把一个任务分成多个剧本来实现,书写个总剧本文件,通过include_tasks:引用子剧本文件。
子剧本文件中只需要些模块部分(task部分即可)
 本文经授权发布,不代表老男孩教育立场。如若转载请联系原作者。


 扫码加入Python学院讨论学习群
 最新文章
最新文章