老男孩教育专注IT教育10余年,只培养IT技术精英
 全国免费咨询电话(渠道合作):400-609-2893




运维工作太忙?一文详解Ansible自动化运维,轻松提升工作效率(上)!
 老男孩IT教育
 技术博客
技术博客
 2023年6月13日 17:56
在日常企业运维工作中,经常遇到有多台主机需要进行管理操作,并且操作的任务还都是相同的,这样重复性的操作任务会大大增加运维人员的工作量。
在日常企业运维工作中,经常遇到有多台主机需要进行管理操作,并且操作的任务还都是相同的,这样重复性的操作任务会大大增加运维人员的工作量。
因此可以通过软件工具,将重复性的工作任务,进行批量的自动化完成,从而形成高效运维的管理体系。
注意事项:
想要自动化一定要先标准化(所有的环境、软件、目录、一致);
尽量进行分组(比如:所有web服务器是1组).
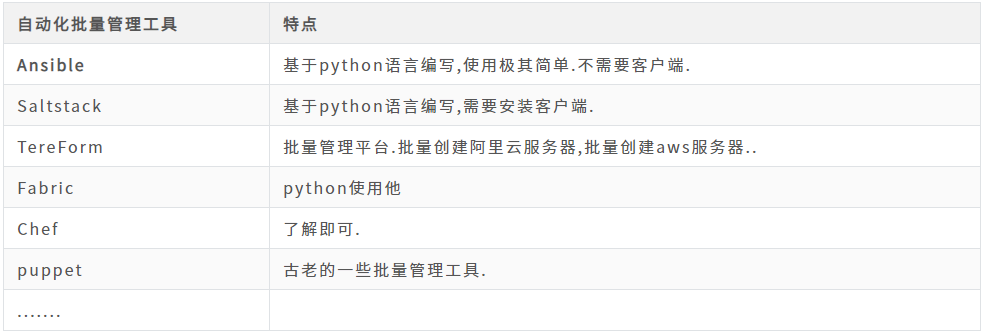
自动化工具选择
Ansible架构
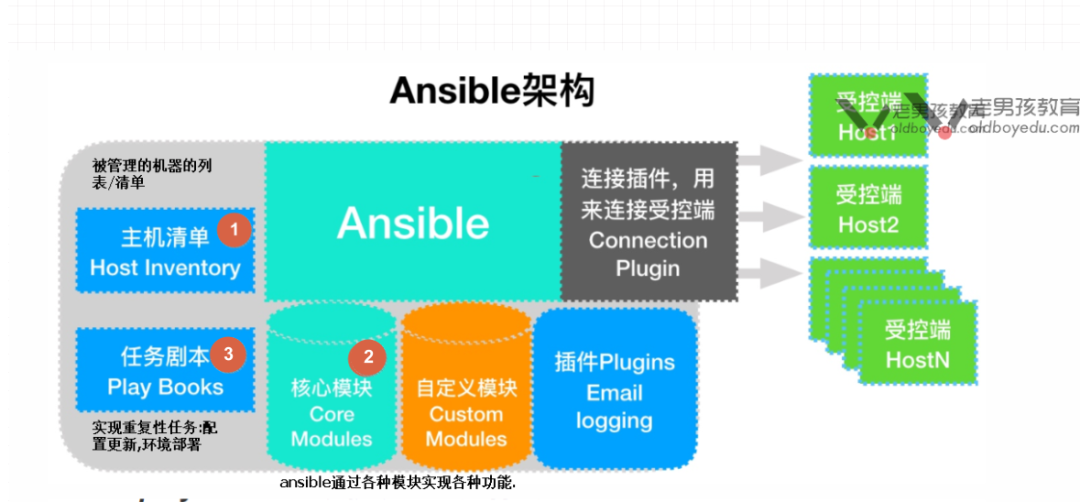
Ansible极速使用指南
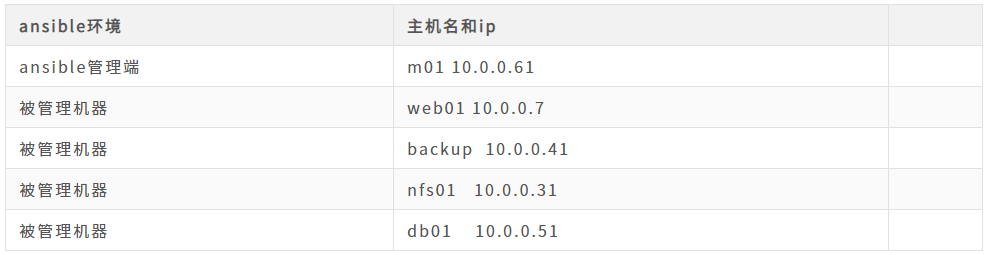
环境准备
[root@m01 ~]# cat /server/scripts/ssh_check.sh
#!/bin/bash
#author: oldboy lidao996
#desc  批量检查脚本

ip_list="10.0.0.7 10.0.0.31 10.0.0.41 10.0.0.51"

echo '--------------------------------------------'
echo '批量执行命令'
echo '--------------------------------------------'

for ip  in  $ip_list
do
    ssh  root@$ip $@
done


[root@m01 ~]# cat /server/scripts/fenfa.sh
#!/bin/bash
#author: oldboy lidao996
#desc  一键自动化创建和分发公钥

ip_list="10.0.0.7 10.0.0.31 10.0.0.41 10.0.0.51"
echo '--------------------------------------------'
echo '1. 创建 key'
echo '--------------------------------------------'
ssh-keygen -f ~/.ssh/id_rsa -P ''

echo '--------------------------------------------'
echo '2. 分发 pub key'
echo '--------------------------------------------'

for ip  in  $ip_list
do
    sshpass -p1  ssh-copy-id -i ~/.ssh/id_rsa.pub  -o StrictHostKeyChecking=no  root@$ip
done
[root@m01 ~]# sh /server/scripts/ssh_check.sh    hostname
--------------------------------------------
批量执行命令
--------------------------------------------
web01
nfs01
backup
db01
Ansible部署
yum install -y ansible
 #epel源中的软件包
初步配置主机清单(inventory)
[root@m01 ~]# cat /etc/ansible/hosts
[oldboy]
172.16.1.7
172.16.1.31
172.16.1.41
172.16.1.51
与Ansible的第1次接触
ansible oldboy -m ping
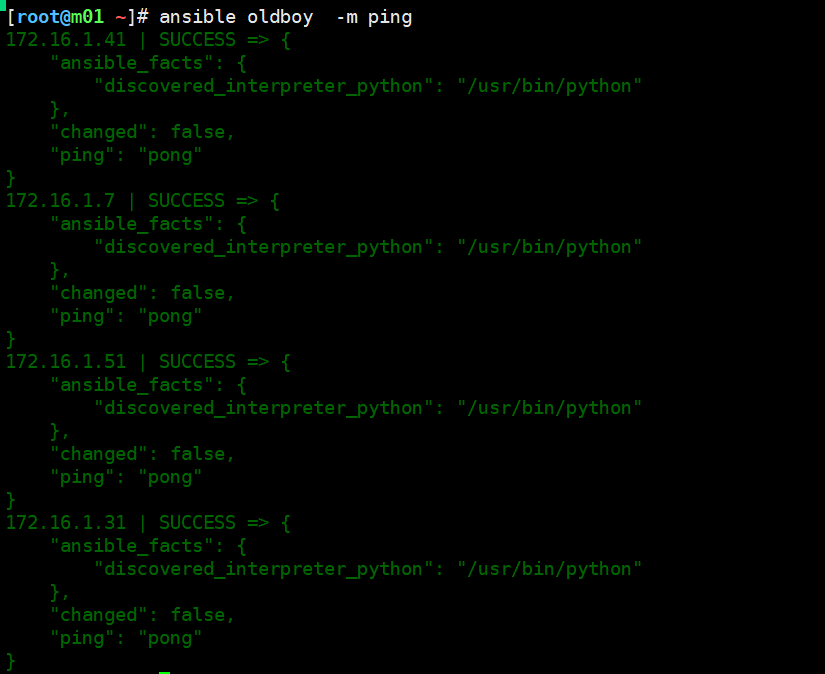
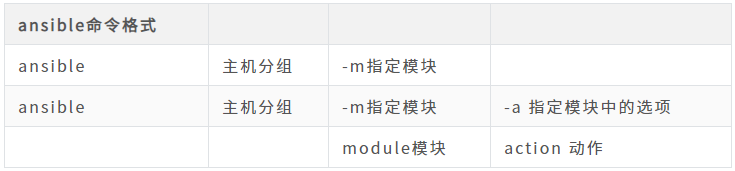
ansible oldboy  -m ping
ansible oldboy  -m command  -a 'hostname'
ansible oldboy  -m command  -a 'hostname -I'
ansible oldboy  -m command  -a 'crontab -l'
Ansible配置文件
/etc/ansible/ansible.cfg #ansible配置文件 configure
[root@m01 ~]# grep  -n '^host_key' /etc/ansible/ansible.cfg
71:host_key_checking = False

/etc/ansible/hosts       #ans主机清单,默认是.
Ansible主机清单
基本格式
[root@m01 ~]# cat /etc/ansible/hosts
[oldboy]    #[组的名字]
172.16.1.7
172.16.1.31
172.16.1.41
172.16.1.51

[web]
172.16.1.7
[db]
172.16.1.51
[nfs]
172.16.1.31
[backup]
172.16.1.41
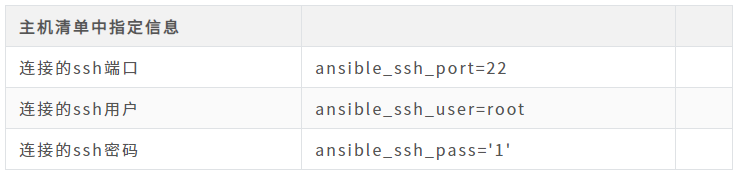
指定用户名、密码、端口
[web]
172.16.1.7 ansible_ssh_port=22 ansible_ssh_user=root ansible_ssh_pass='1'
[db]
172.16.1.51
[nfs]
172.16.1.31
[backup]
172.16.1.41
子组
我想把多个主机分组进行合并,比如把db,nfs,backup合并成一个组叫data组.
[web]
172.16.1.7
[db]
172.16.1.51
[nfs]
172.16.1.31
[backup]
172.16.1.41

[data:children]  #data:children表示 data是创建的子组 组里面包含 db,nfs,backup3个组.
db
nfs
backup
主机清单案例
[root@m01 ~]# cat  /etc/ansible/hosts
[web]
172.16.1.7
[nfs]
172.16.1.31
[backup]
172.16.1.41
[db]
172.16.1.51

[data:children]
db
nfs
backup
案例01 查看与使用指定的子组 data
[root@m01 ~]# ansible data   -m  command  -a 'hostname'
172.16.1.31 | CHANGED | rc=0 >>
nfs01
172.16.1.51 | CHANGED | rc=0 >>
db01
172.16.1.41 | CHANGED | rc=0 >>
backup
案例02:查看指定的组db
[root@m01 ~]# ansible db   -m  command  -a 'hostname'
172.16.1.51 | CHANGED | rc=0 >>
db01
案例03:查看所有主机情况
[root@m01 ~]# ansible all   -m  command  -a 'hostname'
172.16.1.51 | CHANGED | rc=0 >>
db01
172.16.1.41 | CHANGED | rc=0 >>
backup
172.16.1.31 | CHANGED | rc=0 >>
nfs01
172.16.1.7 | CHANGED | rc=0 >>
web01
[root@m01 ~]#
案例04:查看某一台机器
[root@m01 ~]# ansible 172.16.1.7   -m  command  -a 'hostname'
172.16.1.7 | CHANGED | rc=0 >>
web01
[root@m01 ~]#
Ansible-命令与脚本类模块
1)command模块
仅支持简单命令,不支持特殊符号,管道。。。
这个模块是默认模块,ansible不加上模块,默认就使用这个模块
ansible all   -m command -a '命令'
ansible all  -a 'hostname' #相当于省略 -m command
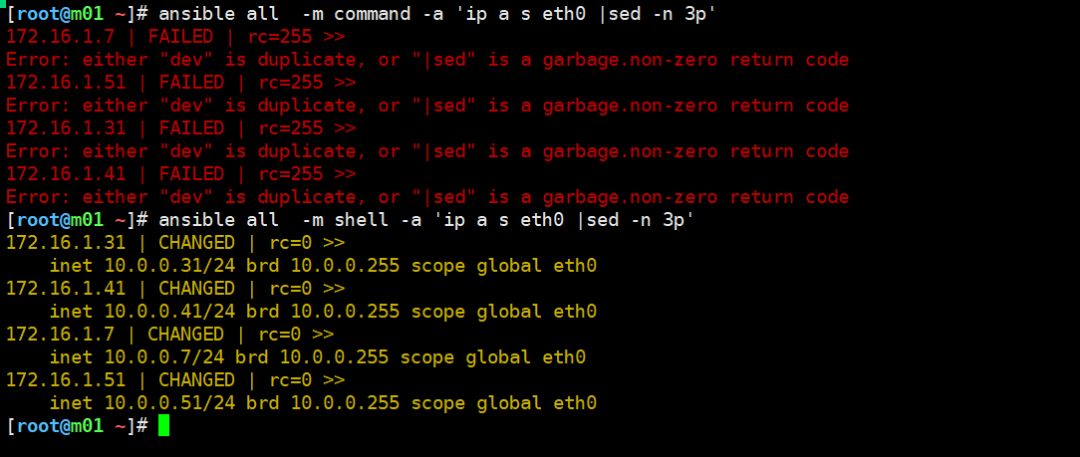
2)shell模块
与command模块类似,shell模块支持特殊符号,执行脚本。。。
[root@m01 ~]# ansible all  -m command -a 'ip a s eth0 |sed -n 3p'
172.16.1.7 | FAILED | rc=255 >>
Error: either "dev" is duplicate, or "|sed" is a garbage.non-zero return code
172.16.1.51 | FAILED | rc=255 >>
Error: either "dev" is duplicate, or "|sed" is a garbage.non-zero return code
172.16.1.31 | FAILED | rc=255 >>
Error: either "dev" is duplicate, or "|sed" is a garbage.non-zero return code
172.16.1.41 | FAILED | rc=255 >>
Error: either "dev" is duplicate, or "|sed" is a garbage.non-zero return code
[root@m01 ~]# ansible all  -m shell -a 'ip a s eth0 |sed -n 3p'
172.16.1.31 | CHANGED | rc=0 >>
    inet 10.0.0.31/24 brd 10.0.0.255 scope global eth0
172.16.1.41 | CHANGED | rc=0 >>
    inet 10.0.0.41/24 brd 10.0.0.255 scope global eth0
172.16.1.7 | CHANGED | rc=0 >>
    inet 10.0.0.7/24 brd 10.0.0.255 scope global eth0
172.16.1.51 | CHANGED | rc=0 >>
    inet 10.0.0.51/24 brd 10.0.0.255 scope global eth0
3)script模块-传输脚本到被管理端并执行脚本
安装ipvsadm
[root@m01 ~]# cat /server/scripts/yum.sh
yum install -y ipvsadm

使用script 模块执行脚本.
ansible db  -m script  -a '/server/scripts/yum.sh'
4)命令与脚本模块

Ansible-文件与目录管理模块
1)file模块
管理文件或目录、软链接。
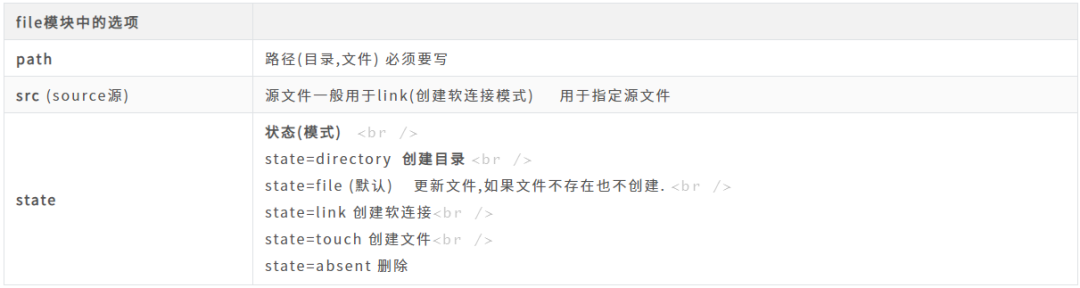
案例01-创建目录/oldboy/目录
 ansible all   -m file  -a 'path=/oldboy state=directory'
 ansible all -a 'ls -ld /oldboy/'
案例02-创建文件/oldboy/oldboy.txt文件
ansible all   -m file  -a 'path=/oldboy/oldboy.txt state=touch'
ansible all -a 'ls -l /oldboy/'
案例03-创建软连接 /oldboy/oldboy.txt 到/tmp/oldboy.txt.soft
ansible all  -m file -a 'src=/oldboy/oldboy.txt  path=/tmp/oldboy.txt.soft  state=link'
[root@m01 ~]#
[root@m01 ~]#
[root@m01 ~]# ansible all -a 'ls -l /tmp/oldboy.txt.soft'
172.16.1.31 | CHANGED | rc=0 >>
lrwxrwxrwx 1 root root 18 Apr 12 12:01 /tmp/oldboy.txt.soft -> /oldboy/oldboy.txt
172.16.1.41 | CHANGED | rc=0 >>
lrwxrwxrwx 1 root root 18 Apr 12 12:01 /tmp/oldboy.txt.soft -> /oldboy/oldboy.txt
172.16.1.51 | CHANGED | rc=0 >>
lrwxrwxrwx 1 root root 18 Apr 12 12:01 /tmp/oldboy.txt.soft -> /oldboy/oldboy.txt
172.16.1.7 | CHANGED | rc=0 >>
lrwxrwxrwx 1 root root 18 Apr 12 12:01 /tmp/oldboy.txt.soft -> /oldboy/oldboy.txt
案例04-删除文件/目录/软连接
ansible all  -m file -a 'path=/oldboy/oldboy.txt  state=absent '  #删除文件
ansible all  -m file -a 'path=/oldboy  state=absent '             #删除目录
ansible all  -m file -a 'path=/tmp/oldboy.txt.soft  state=absent ' #删除软连
案例05-创建文件/tmp/oldboy.txt,所有者root,用户组root,权限755
ansible all -m file -a 'path=/tmp/oldboy.txt  owner=root group=root mode=755     state=touch'
ansible all -a 'ls -l /tmp/oldboy.txt'
2)copy远程传输模块
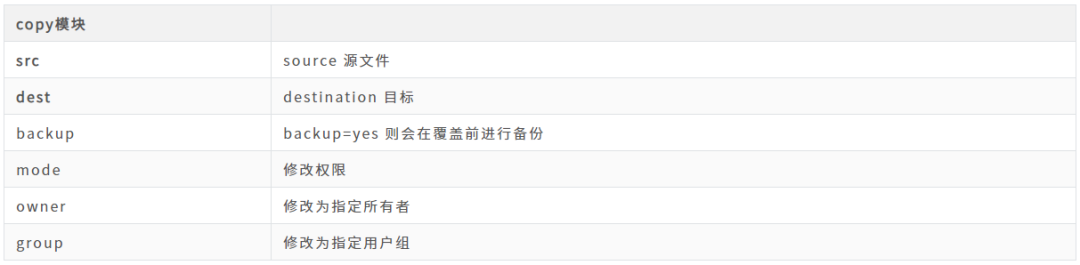
案例01-传输/etc/hosts文件到/etc/hosts
ansible all -m copy -a 'src=/etc/hosts dest=/etc/hosts '
案例02-传输/etc/hosts文件到/etc/hosts-先备份然后修改
ansible all -m copy  -a  'src=/etc/hosts   dest=/etc/hosts backup=yes'
[root@m01 ~]# ansible all -m shell -a 'ls -l /etc/hosts*'
172.16.1.41 | CHANGED | rc=0 >>
-rw-r--r--  1 root root 328 Apr 12 12:24 /etc/hosts
-rw-r--r--  1 root root 327 Apr 12 12:21 /etc/hosts.81057.2022-04-12@12:24:20~
-rw-r--r--. 1 root root 370 Jun  7  2013 /etc/hosts.allow
-rw-r--r--. 1 root root 460 Jun  7  2013 /etc/hosts.deny
172.16.1.7 | CHANGED | rc=0 >>
-rw-r--r--  1 root root 328 Apr 12 12:24 /etc/hosts
-rw-r--r--  1 root root 327 Apr 12 12:21 /etc/hosts.18115.2022-04-12@12:24:20~
-rw-r--r--. 1 root root 370 Jun  7  2013 /etc/hosts.allow
-rw-r--r--. 1 root root 460 Jun  7  2013 /etc/hosts.deny
172.16.1.31 | CHANGED | rc=0 >>
-rw-r--r--  1 root root 328 Apr 12 12:24 /etc/hosts
-rw-r--r--  1 root root 327 Apr 12 12:21 /etc/hosts.46979.2022-04-12@12:24:20~
-rw-r--r--. 1 root root 370 Jun  7  2013 /etc/hosts.allow
-rw-r--r--. 1 root root 460 Jun  7  2013 /etc/hosts.deny
172.16.1.51 | CHANGED | rc=0 >>
-rw-r--r--  1 root root 328 Apr 12 12:24 /etc/hosts
-rw-r--r--  1 root root 327 Apr 12 12:21 /etc/hosts.21455.2022-04-12@12:24:20~
-rw-r--r--. 1 root root 370 Jun  7  2013 /etc/hosts.allow
-rw-r--r--. 1 root root 460 Jun  7  2013 /etc/hosts.deny
3)文件管理与传输模块小结

Ansible-服务管理模块
1)systemd
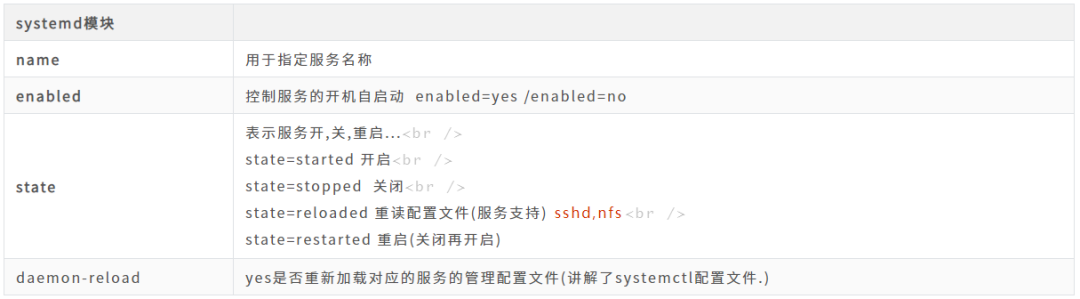
案例01-关闭firewalld
ansible all  -m systemd -a 'name=firewalld  enabled=no state=stopped'
ansible all -a  'systemctl status firewalld'
案例02-开启sshd服务
ansible all -m systemd  -a  'name=sshd  enabled=yes state=started'
ansible all -a  'systemctl status sshd'
案例03-重启backup这台机器上面的rsync服务
ansible backup -m systemd -a 'name=rsyncd state=restarted'
2)service 了解
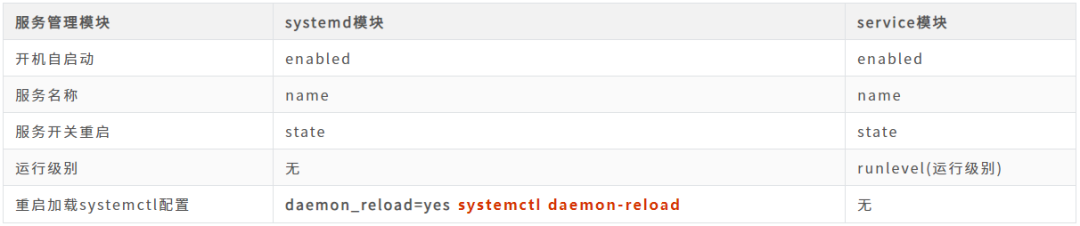
3)服务管理模块小结

Ansible-软件包管理模块
1)yum源配置管理模块
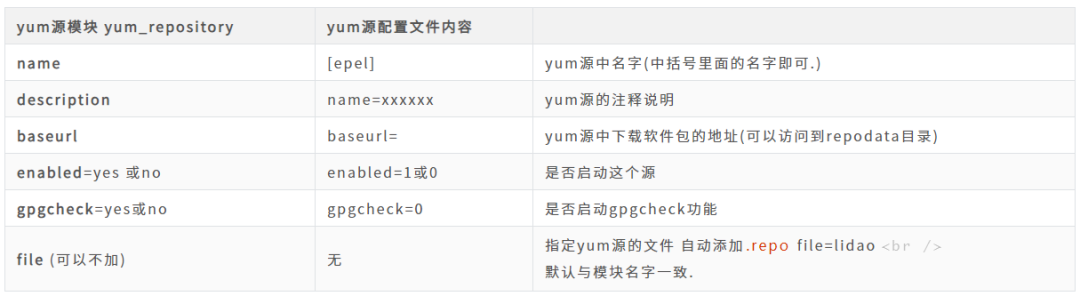
[root@m01 ~]# cat /etc/yum.repos.d/epel.repo
案例01-批量添加nginx-yum源
[nginx]
name=nginx stable repo
baseurl=http://nginx.org/packages/centos/$releasever/$basearch/
gpgcheck=1
enabled=1
gpgkey=https://nginx.org/keys/nginx_signing.key
ansible web  -m yum_repository   -a 'name=nginx description="nginx stable repo" baseurl="http://nginx.org/packages/centos/$releasever/$basearch/"  gpgcheck=no              enabled=yes'
 #注意未来也可以通过,copy模块实现.
2)yum模块

案例01-安装lrzsz
ansible all  -a 'rpm -e lrzsz '
ansible all  -m yum -a 'name=lrzsz  state=installed '
案例02-安装sl、cowsay、aalib
ansible web -m yum -a 'name=sl,cowsay,aalib state=installed'
3)get_url模块(wget)

案例01-下载tengine源码包到/server/tools/(不存在)目录下
下载地址: https://tengine.taobao.org/download/tengine-2.3.3.tar.gz

ansible web  -m file -a 'path=/server/tools/  state=directory'
ansible web  -m get_url  -a 'url=https://tengine.taobao.org/download/tengine-2.3.3.tar.gz   dest=/server/tools/'
ansible web -a 'tree /server/'
4)软件包管理模块小结

后续内容推荐阅读:运维工作太忙?一文详解Ansible自动化运维,轻松提升工作效率(下)!
 本文经授权发布,不代表老男孩教育立场。如若转载请联系原作者。


 扫码加入Python学院讨论学习群
 最新文章
最新文章