老男孩教育专注IT教育10余年,只培养IT技术精英
 全国免费咨询电话(渠道合作):400-609-2893


万字长文—LNMP架构的搭建及应用部署详解(超详细)
 老男孩IT教育
 技术博客
技术博客
 2023年5月24日 17:22
LNMP是指一组通常一起使用来运行动态网站或者服务器的自由软件名称首字母缩写。L指Linux,N指Nginx,M一般指MySQL,也可以指MariaDB,P一般指PHP,也可以指Perl或Python。
LNMP架构
LNMP是指一组通常一起使用来运行动态网站或者服务器的自由软件名称首字母缩写。L指Linux,N指Nginx,M一般指MySQL,也可以指MariaDB,P一般指PHP,也可以指Perl或Python。
1. LNMP介绍
LNMP代表的就是:Linux系统下Nginx+MySQL+PHP这种网站服务器架构。
Linux是一类Unix计算机操作系统的统称,是目前最流行的免费操作系统。代表版本有:debian、centos、ubuntu、fedora、gentoo等。
Nginx (engine x) 是一个高性能的HTTP和反向代理web服务器,同时也提供了IMAP/POP3/SMTP服务。其特点是占有内存少,并发能力强,事实上nginx的并发能力在同类型的网页服务器中表现较好
MySQL是一种开放源代码的关系型数据库管理系统(RDBMS),使用最常用的数据库管理语言--结构化查询语言(SQL)进行数据库管理。MySQL不仅是开放源代码的,也因为其速度、可靠性和适应性而备受关注。大多数人都认为在不需要事务化处理的情况下,MySQL是管理内容最好的选择。
PHP即“超文本预处理器”,是一种通用开源脚本语言。PHP是在服务器端执行的脚本语言,与C语言类似,是常用的网站编程语言。因为PHP的开源性、免费性、快捷性等特点使其成为目前最流行的编程语言。
2. 优点
四种软件均为免费开源软件,组合到一起,成为一个免费、高效、扩展性强的网站服务系统。
Nginx使用更少的资源,支持更多的并发连接,体现更高的效率。
Nginx 既可以在内部直接支持Rails和PHP,也可以支持作为 HTTP代理服务器对外进行服务。
Nginx 安装非常的简单,配置文件非常简洁(还能够支持perl语法)。Nginx支持平滑加载新的配置,还能够在不间断服务的情况下进行软件版本的升级。
3. LNMP工作原理
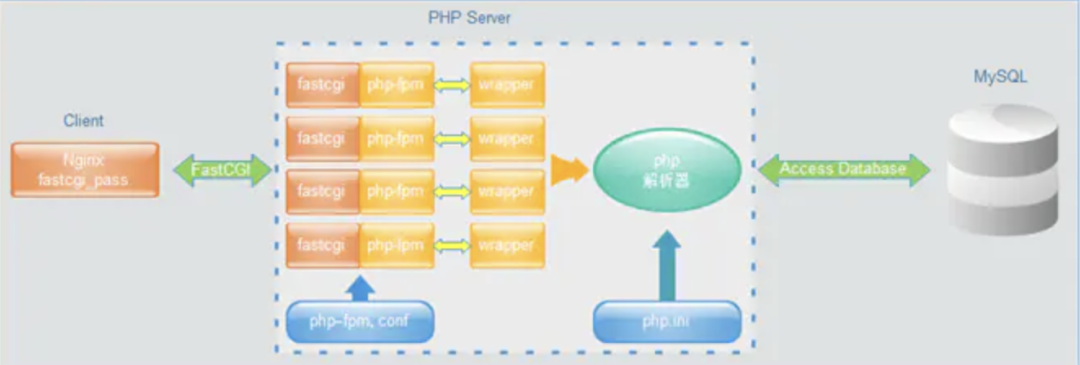
第一步:用户在浏览器输入域名或者IP访问网站
第二步:用户在访问网站的时候,向web服务器发出http request请求,服务器响应并处理web请求,返回静态网页资源,如CSS、picture、video等,然后缓存在用户主机上。
第三步:服务器调用动态资源,PHP脚本调用fastCGI传输给php-fpm,然后php-fpm调用PHP解释器进程解析PHP脚本。
第四步:出现大流量高并发情况,PHP解析器也可以开启多进程处理高并发,将解析后的脚本返回给php-fpm,然后php-fpm再调给fast-cgi将脚本解析信息传送给nginx,服务器再通过http response传送给用户浏览器。
第五步:浏览器再将服务器传送的信息进行解析与渲染,呈现给用户。
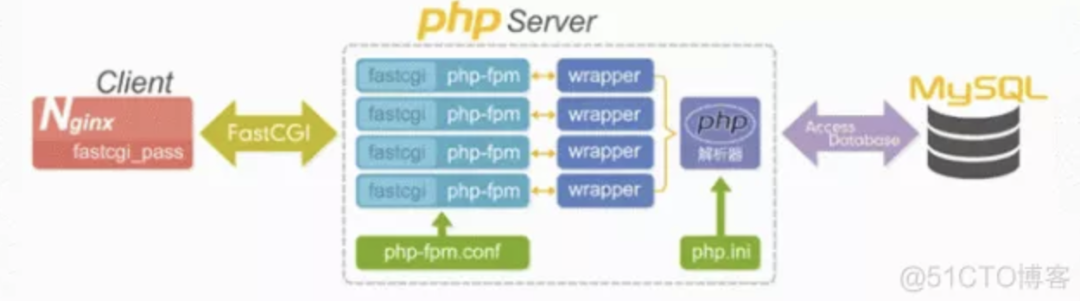
4. FastCGI
4.1 什么是CGI
CGI全称"通用网关接口"(Common Gateway Interface),用于HTTP服务器与其它机器上的程序服务通信交流的一种工具,CGI程序须运行在网络服务器上。
传统CGI接口方式的主要缺点是性能较差,因为每次HTTP服务器遇到动态程序时都需要重启解析器来执行解析,然后结果被返回给HTTP服务器。这在处理高并发访问几乎是不可用的,因此就诞生了FastCGI。另外传统的CGI接口方式安全性也很差。
4.2 什么是FastCGI
FastCGI是一个可伸缩地、高速地在HTTP服务器和动态脚本语言间通信的接口(FastCGI接口在Linux下是socket(可以是文件socket,也可以是ip socket)),主要优点是把动态语言和HTTP服务器分离开来。多数流行的HTTP服务器都支持FastCGI,包括Apache、Nginx和lightpd。
同时,FastCGI也被许多脚本语言所支持,比较流行的脚本语言之一为PHP。FastCGI接口方式采用C/S架构,可以将HTTP服务器和脚本解析服务器分开,同时在脚本解析服务器上启动一个或多个脚本解析守护进程。当HTTP服务器每次遇到动态程序时,可以将其直接交付给FastCGI进程执行,然后将得到的结构返回给浏览器。这种方式可以让HTTP服务器专一地处理静态请求或者将动态脚本服务器的结果返回给客户端,这在很大程度上提高了整个应用系统的性能。
FastCGI的重要特点:
FastCGI是HTTP服务器和动态脚本语言间通信的接口或者工具。
FastCGI优点是把动态语言解析和HTTP服务器分离开来。
Nginx、Apache、Lighttpd以及多数动态语言都支持FastCGI。
FastCGI接口方式采用C/S架构,分为客户端(HTTP服务器)和服务端(动态语言解析服务器)。
PHP动态语言服务端可以启动多个FastCGI的守护进程。
HTTP服务器通过FastCGI客户端和动态语言FastCGI服务端通信。
4.3 Nginx FastCGI的运行原理
Nginx不支持对外部动态程序的直接调用或者解析,所有的外部程序(包括PHP)必须通过FastCGI接口来调用。
FastCGI接口在Linux下是socket(可以是文件socket,也可以是ip socket)。为了调用CGI程序,还需要一个FastCGI的wrapper,这个wrapper绑定在某个固定socket上,如端口或者文件socket。
当Nginx将CGI请求发送给这个socket的时候,通过FastCGI接口,wrapper接收到请求,然后派生出一个新的线程,这个线程调用解释器或者外部程序处理脚本并读取返回数据;接着,wrapper再将返回的数据通过FastCGI接口,沿着固定的socket传递给Nginx;最后,Nginx将返回的数据发送给客户端,这就是Nginx+FastCGI的整个运作过程。
FastCGI的主要优点是把动态语言和HTTP服务器分离开来,是Nginx专一处理静态请求和向后转发动态请求,而PHP/PHP-FPM服务器专一解析PHP动态请求。
5. 实战部署LNMP架构(yum部署WordPress站点)
环境说明:

LNMP+wordpress部署
网站的LNMP架构部署:
Mysql服务安装:
第一个历程: 安装数据库软件
yum install mariadb-server mariadb -y
第二个历程: 启动数据库服务
systemctl start mariadb.service
systemctl enable mariadb.service
第三个历程: 给mysql数据库服务设置密码
mysqladmin -u root password '123456' --- 设置密码
mysql -u root -p123456
Nginx服务部署:
第一个历程: 更新nginx官方yum源
vim /etc/yum.repos.d/nginx.repo
[nginx-stable]
name=nginx stable repo
baseurl=http://nginx.org/packages/centos/$releasever/$basearch/
gpgcheck=1
enabled=1
gpgkey=https://nginx.org/keys/nginx_signing.key
第二个历程: yum安装nginx软件
yum install -y nginx
第三个历程: 启动nginx服务,检查服务是否安装正确
systemctl start nginx
systemctl enable nginx
测试访问nginx服务
第四个历程:修改nginx进程所有者
useradd -s /sbin/nologin -M www
vim /etc/nginx/nginx.conf
user www;
systemctl reload nginx
PHP服务部署:
第一个历程: 更新yum源/卸载系统自带的PHP软件
yum remove php-mysql php php-fpm php-common
rpm -Uvh https://dl.fedoraproject.org/pub/epel/epel-release-latest-7.noarch.rpm
rpm -Uvh https://mirror.webtatic.com/yum/el7/webtatic-release.rpm
第二个历程: 安装php软件
yum install -y php71w php71w-cli php71w-common php71w-devel php71w-embedded php71w-gd php71w-mcrypt php71w-mbstring php71w-pdo php71w-xml php71w-fpm php71w-mysqlnd php71w-opcache php71w-pecl-memcached php71w-pecl-redis php71w-pecl-mongodb
第三个历程: 编写配置文件
vim /etc/php-fpm.d/www.conf
user = www
group = www
PS: 保证nginx进程的管理用户和php服务进程的管理用户保持一致
第四个历程: 启动php服务
systemctl start php-fpm
systemctl enable php-fpm
实现LNMP之间建立联系
1. 实现nginx + php 建立关系
第一个历程: 编写nginx文件
编写nginx配置文件
vim /etc/nginx/conf.d/default.conf
server {
listen 80;
server_name localhost;
location / {
root /usr/share/nginx/html;
index index.html index.htm;
}
error_page 500 502 503 504 /50x.html;
location = /50x.html {
root /usr/share/nginx/html;
}
location ~ \.php$ { #把下面所有注释取消
root /usr/share/nginx/html; #修改站点目录
fastcgi_pass 127.0.0.1:9000;
fastcgi_index index.php;
fastcgi_param SCRIPT_FILENAME $document_root$fastcgi_script_name; #修改配置
include fastcgi_params;
}
}
重启nginx服务
第二个历程: 编写动态资源文件
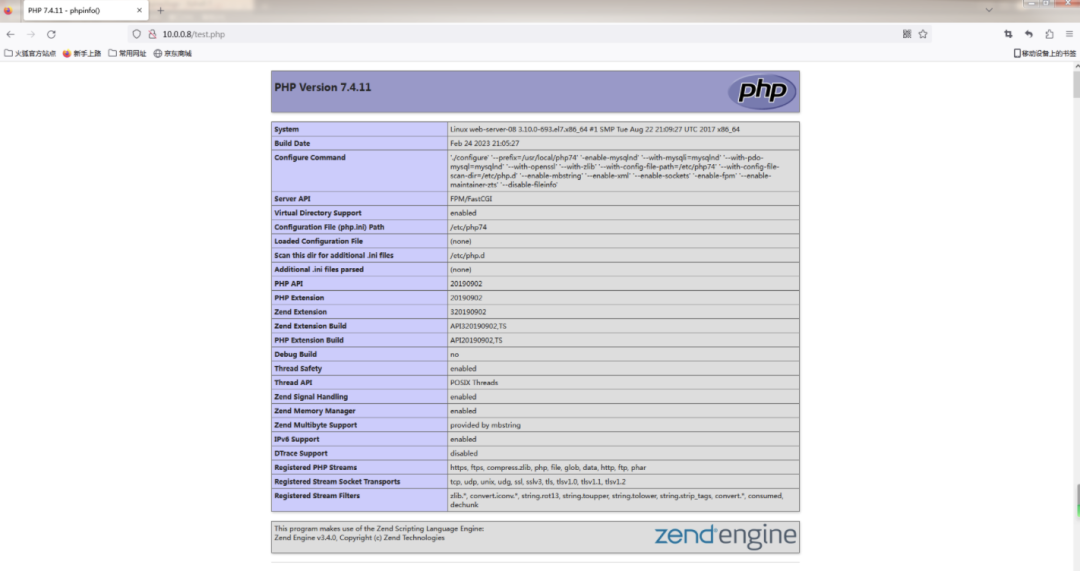
[root@web01 conf.d]# vim /usr/share/nginx/html/test_php.php
<?php
phpinfo();
?>
第三个历程: 进行访问测试
2.部署搭建网站页面
第一个历程: 将代码解压,将解压后信息放入到站点目录中
unzip wordpress-5.3.2-zh_CN.zip
[root@web01-7 html]# ls
50x.html index.html test_php.php wordpress
第二个历程:编辑nginx配置文件,修改站点目录
vim /etc/nginx/conf.d/default.conf
server {
listen 80;
server_name localhost;
location / {
root /usr/share/nginx/html/wordpress; #修改站点目录
index index.html index.htm index.php;
}
error_page 500 502 503 504 /50x.html;
location = /50x.html {
root /usr/share/nginx/html;
}
location ~ \.php$ {
root /usr/share/nginx/html/wordpress; #修改站点目录
fastcgi_pass 127.0.0.1:9000;
fastcgi_index index.php;
fastcgi_param SCRIPT_FILENAME $document_root$fastcgi_script_name;
include fastcgi_params;
}
}
systemctl reload nginx #重新加载nginx
第三个历程:修改站点目录权限
chown -R www.www wordpress/
第四个历程:登录网页,初始化配置
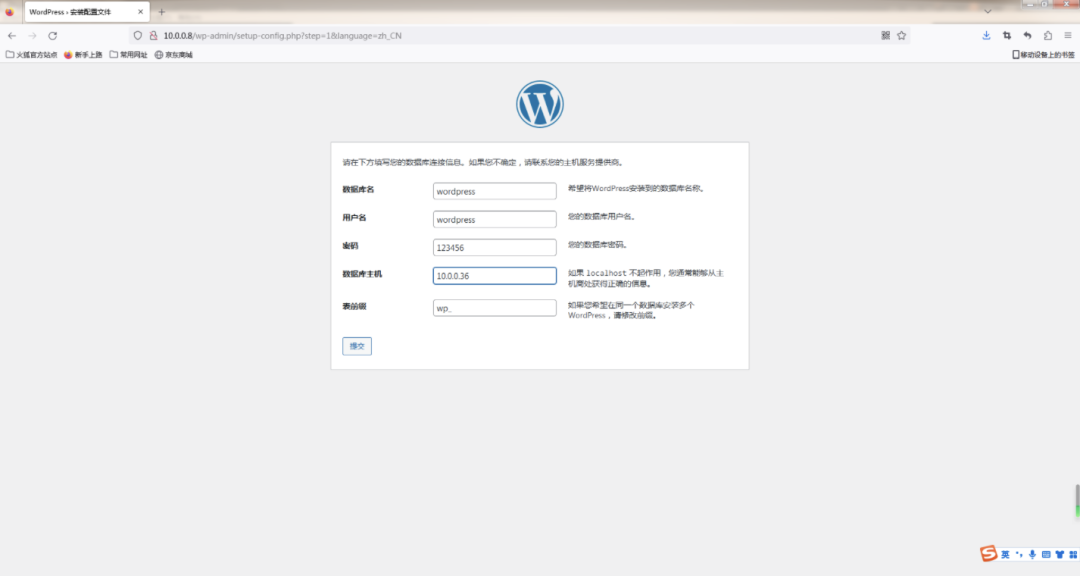
第五个历程: 对数据库服务进行配置
创建数据库: create database wordpress;
检查: show databases;
创建数据库管理用户: grant all on wordpress.* to 'wordpress'@'%' identified by '123456';
刷新数据库:flush privileges;
检查: select user,host from mysql.user
6. 实战部署LNMP架构(编译安装WordPress)
6.1 部署Nginx
#1、安装依赖
[root@web-server-08 ~]# yum install gcc pcre-devel openssl-devel zlib-devel -y

#2、创建nginx用户
[root@web-server-08 ~]# useradd -s /sbin/nologin nginx -M

#3、下载nginx源码包
[root@web-server-08 ~]# cd /usr/local/src/
[root@web-server-08 src]# wget http://nginx.org/download/nginx-1.18.0.tar.gz
[root@web-server-08 src]# tar xf nginx-1.18.0.tar.gz

#4、编译安装
[root@web-server-08 src]# cd nginx-1.18.0
[root@web-server-08 nginx-1.18.0]# ./configure --prefix=/usr/local/nginx --user=nginx --group=nginx --with-http_ssl_module --with-http_v2_module --with-http_realip_module --with-http_stub_status_module --with-http_gzip_static_module --with-pcre --with-stream --with-stream_ssl_module --with-stream_realip_module
[root@web-server-08 nginx-1.18.0]# make && make install

#5、授权
[root@web-server-08 nginx-1.18.0]# chown -R nginx:nginx /usr/local/nginx

#6、设置开机自启
[root@web-server-08 ~]# cat > /lib/systemd/system/nginx.service <<EOF
[Unit]
Description=nginx service
After=network.target

[Service]
Type=forking
ExecStart=/usr/local/nginx/sbin/nginx
ExecReload=/usr/local/nginx/sbin/nginx -s reload
ExecStop=/usr/local/nginx/sbin/nginx -s quit
PrivateTmp=true

[Install]
WantedBy=multi-user.target
EOF
[root@web-server-08 nginx-1.18.0]# systemctl daemon-reload
[root@web-server-08 nginx-1.18.0]# systemctl enable nginx
Created symlink from /etc/systemd/system/multi-user.target.wants/nginx.service to /usr/lib/systemd/system/nginx.service.
[root@web-server-08 nginx-1.18.0]# systemctl start nginx
6.2 部署Mysql
1、下载并上传软件至/usr/local/src
[root@mysql-36 ~]# cd /usr/local/src
[root@mysql-36 src]# ls
mysql-5.7.31-linux-glibc2.12-x86_64.tar.gz

2、解压软件
[root@mysql-36 src]# tar xf mysql-5.7.31-linux-glibc2.12-x86_64.tar.gz
[root@mysql-36 src]# mv mysql-5.7.31-linux-glibc2.12-x86_64  ../mysql-5.7.31
[root@mysql-36 src]# cd ..
[root@mysql-36 local]# ln -s mysql-5.7.31/ mysql

3、用户的创建处理原始环境
[root@mysql-36 ~]# yum remove mariadb-libs-5.5.60-1.el7_5.x86_64 -y
[root@mysql-36 ~]# rpm -qa |grep mariadb
[root@mysql-36 ~]# useradd -s /sbin/nologin mysql

4、设置环境变量
vim /etc/profile
export PATH=/usr/local/mysql/bin:$PATH
[root@mysql-36 ~]# source /etc/profile
[root@mysql-36 ~]# mysql -V
mysql  Ver 14.14 Distrib 5.7.31, for linux-glibc2.12 (x86_64) using  EditLine wrapper

5、创建数据路径并授权
添加一块新磁盘模拟数据盘
格式化并挂载磁盘
[root@mysql-36 ~]# mkfs.xfs /dev/sdb
[root@mysql-36 ~]# mkdir /data
[root@mysql-36 ~]# blkid
[root@mysql-36 ~]# vim /etc/fstab
UUID=7dfc98e4-6ab0-450e-adc6-c26fe729e6e0 /data  xfs  defaults  0 0
[root@mysql-36 ~]# mount -a
[root@mysql-36 local]# df -h
文件系统        容量  已用  可用 已用% 挂载点
/dev/sda3        17G  2.9G   15G   17% /
devtmpfs        903M     0  903M    0% /dev
tmpfs           912M     0  912M    0% /dev/shm
tmpfs           912M  8.6M  904M    1% /run
tmpfs           912M     0  912M    0% /sys/fs/cgroup
/dev/sdb1        10G  166M  9.9G    2% /data
/dev/sda1      1014M  135M  880M   14% /boot
tmpfs           183M     0  183M    0% /run/user/0

授权
chown -R mysql.mysql /usr/local/mysql/*
chown -R mysql.mysql /data

6、初始化数据(创建系统数据)
[root@mysql-36 ~]# mkdir /data/mysql/data -p
[root@mysql-36 ~]# chown -R mysql.mysql /data
[root@mysql-36 ~]# mysqld --initialize --user=mysql --basedir=/usr/local/mysql --datadir=/data/mysql/data

说明:
--initialize 参数:
1. 对于密码复杂度进行定制:12位,4种
2. 密码过期时间:180天
3. 给root@localhost用户设置临时密码

报错:
mysqld: error while loading shared libraries: libaio.so.1: cannot open shared object file: No such file or directory
解决:
[root@mysql-36 ~]# yum install -y libaio-devel

[root@mysql-36 ~]# mysqld --initialize --user=mysql --basedir=/usr/local/mysql --datadir=/data/mysql/data
2019-06-13T04:21:27.706564Z 1 [Note] A temporary password is generated for root@localhost: =mrV)_16is4U

--initialize-insecure 参数:
无限制,无临时密码
[root@mysql-36 /data/mysql/data]# \rm -rf /data/mysql/data/*
[root@mysql-36 ~]# mysqld --initialize-insecure --user=mysql --basedir=/usr/local/mysql --datadir=/data/mysql/data


7、配置文件的准备
cat >/etc/my.cnf <<EOF
[mysqld]
user=mysql
basedir=/usr/local/mysql
datadir=/data/mysql/data
socket=/tmp/mysql.sock
server_id=6
port=3306
[mysql]
socket=/tmp/mysql.sock
EOF

8、启动数据库
第一种:用service
[root@mysql-36 /etc/init.d]# cp /usr/local/mysql/support-files/mysql.server  /etc/init.d/mysqld
[root@mysql-36 /etc/init.d]# service mysqld restart

第二种:用systemd
注意:sysv方式启动过的话,需要先提前关闭,才能以下方式登录
cat >/etc/systemd/system/mysqld.service <<EOF
[Unit]
Description=MySQL Server
Documentation=man:mysqld(8)
Documentation=http://dev.mysql.com/doc/refman/en/using-systemd.html
After=network.target
After=syslog.target
[Install]
WantedBy=multi-user.target
[Service]
User=mysql
Group=mysql
ExecStart=/usr/local/mysql/bin/mysqld --defaults-file=/etc/my.cnf
LimitNOFILE = 5000
EOF
[root@mysql-36 local]# systemctl enable mysqld
[root@mysql-36 local]# systemctl start mysqld
6.3 部署PHP
https://www.cnblogs.com/kaikaiya/p/16598916.html
#1、安装依赖
[root@web-server-08 nginx-1.18.0]# yum install epel-release -y
[root@web-server-08 nginx-1.18.0]# yum install gcc openssl-devel libxml2-devel bzip2-devel libmcrypt-devel sqlite-devel oniguruma-devel -y

#2、下载php源码文件
[root@web-server-08 nginx-1.18.0]# cd /usr/local/src
[root@web-server-08 src]# wget https://www.php.net/distributions/php-7.4.11.tar.xz

#3、编译安装php
[root@web-server-08 src]# tar xf php-7.4.11.tar.xz
[root@web-server-08 src]# cd php-7.4.11
[root@web-server-08 php-7.4.11]# ./configure --prefix=/usr/local/php74 -enable-mysqlnd --with-mysqli=mysqlnd --with-pdo-mysql=mysqlnd --with-openssl --with-zlib --with-config-file-path=/etc/php74 --with-config-file-scan-dir=/etc/php.d --enable-mbstring --enable-xml --enable-sockets -enable-fpm --enable-maintainer-zts --disable-fileinfo
[root@web-server-08 php-7.4.11]# make && make install

#4、生成配置文件
[root@web-server-08 php-7.4.11]# cp /usr/local/src/php-7.4.11/php.ini-production /etc/php.ini
[root@web-server-08 php-7.4.11]# cd /usr/local/php74/etc/
[root@web-server-08 etc]# cp php-fpm.conf.default php-fpm.conf
[root@web-server-08 etc]# cd php-fpm.d/
[root@web-server-08 php-fpm.d]# cp www.conf.default www.conf
[root@web-server-08 php-fpm.d]# grep '^[^;]' www.conf
[www]
user = nginx
group = nginx
listen = 127.0.0.1:9000
pm = dynamic
pm.max_children = 5
pm.start_servers = 2
pm.min_spare_servers = 1
pm.max_spare_servers = 3

#5、创建访问日志路径
[root@web-server-08 php-fpm.d]# mkdir -p /usr/local/php74/log

#6、启动并验证php
[root@web-server-08 php-fpm.d]# /usr/local/php74/sbin/php-fpm -t
[24-Feb-2023 21:16:06] NOTICE: configuration file /usr/local/php74/etc/php-fpm.conf test is successful
[root@web-server-08 php-fpm.d]# cp -a /usr/local/src/php-7.4.11/sapi/fpm/php-fpm.service /usr/lib/systemd/system/
[root@web-server-08 php-fpm.d]# systemctl daemon-reload
[root@web-server-08 php-fpm.d]# systemctl enable --now php-fpm
Created symlink from /etc/systemd/system/multi-user.target.wants/php-fpm.service to /usr/lib/systemd/system/php-fpm.service.
[root@web-server-08 php-fpm.d]# ss -lntp|grep 9000
LISTEN     0      128    127.0.0.1:9000                     *:*                   users:(("php-fpm",pid=124723,fd=8),("php-fpm",pid=124722,fd=8),("php-fpm",pid=124721,fd=6))

#7、配置nginx支持fastcgi
[root@web-server-08 php-fpm.d]# vim /usr/local/nginx/conf/nginx.conf
#user  nobody;
worker_processes  1;

#error_log  logs/error.log;
#error_log  logs/error.log  notice;
#error_log  logs/error.log  info;

#pid        logs/nginx.pid;
events {
    worker_connections  1024;
}

http {
    include       mime.types;
    default_type  application/octet-stream;

    sendfile        on;

    keepalive_timeout  65;

    server {
        listen       80;
        server_name  localhost;

        location / {
            root   /data/wordpress;  #指定wordpress目录
            index  index.php index.html index.htm;  #指定默认主页
        }

        error_page   500 502 503 504  /50x.html;
        location = /50x.html {
            root   html;
        }

        location ~ \.php$ {  #实现php-fpm
            root           /data/wordpress;
            fastcgi_pass   127.0.0.1:9000;
            fastcgi_index  index.php;
            fastcgi_param  SCRIPT_FILENAME  $document_root$fastcgi_script_name;
            include        fastcgi_params;
        }

    }

}
[root@web-server-08 php-fpm.d]# cd /usr/local/nginx/sbin/
[root@web-server-08 sbin]# ./nginx -t
nginx: the configuration file /usr/local/nginx/conf/nginx.conf syntax is ok
nginx: configuration file /usr/local/nginx/conf/nginx.conf test is successful
[root@web-server-08 sbin]# systemctl restart nginx

#8、测试php
[root@web-server-08 sbin]# mkdir -p /data/wordpress
[root@web-server-08 sbin]# cd /data/wordpress/
[root@web-server-08 wordpress]# vim test.php
<?php
phpinfo();
?>
6.4 部署wordpress
#1、获取wordpress
https://cn.wordpress.org/download/#download-install
进入官网获取软件

#2、解压wordpress至目录中
[root@web-server-08 logs]# cd /usr/local/src/
[root@web-server-08 src]# tar xf wordpress-6.1.1-zh_CN.tar.gz
[root@web-server-08 src]# mv wordpress/* /data/wordpress/

#3、安装wordpress

数据库创建wordpress账户
[root@mysql-36 ~]# mysql
Welcome to the MySQL monitor.  Commands end with ; or \g.
Your MySQL connection id is 6
Server version: 5.7.36 MySQL Community Server (GPL)

Copyright (c) 2000, 2021, Oracle and/or its affiliates.

Oracle is a registered trademark of Oracle Corporation and/or its
affiliates. Other names may be trademarks of their respective
owners.

Type 'help;' or '\h' for help. Type '\c' to clear the current input statement.

mysql> create database wordpress;
Query OK, 1 row affected (0.00 sec)

mysql> grant all on wordpress.* to wordpress@'%' identified by '123456';
Query OK, 0 rows affected, 1 warning (0.00 sec)

mysql> flush privileges;
Query OK, 0 rows affected (0.01 sec)
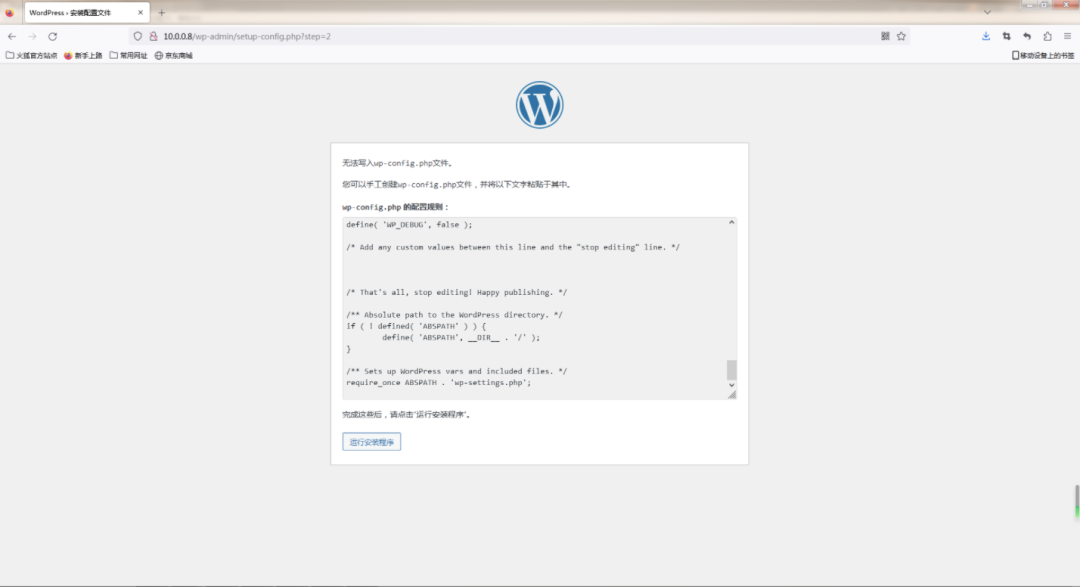
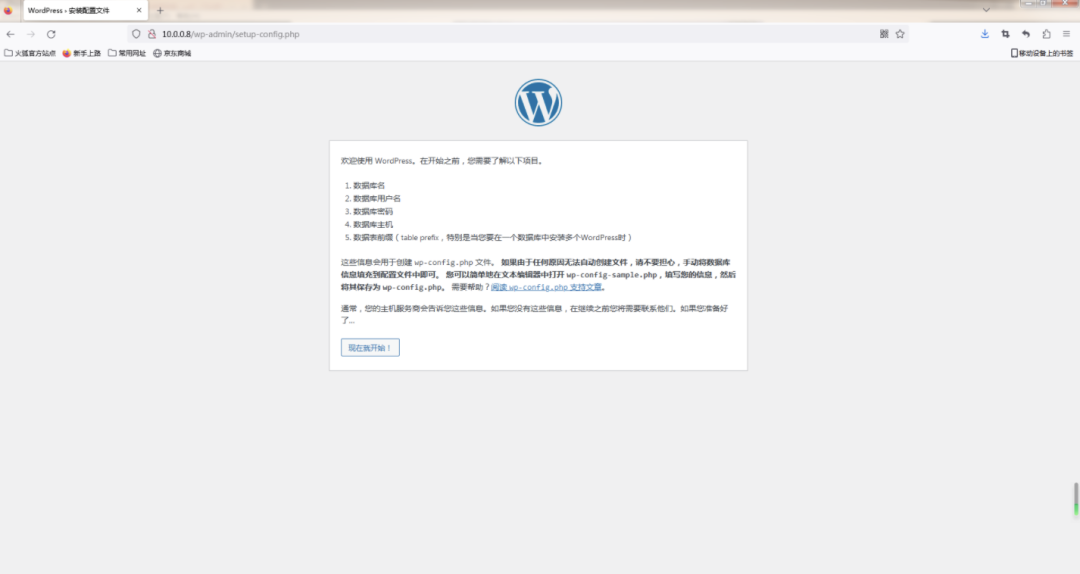
#需要手动创建wp-config.php,并把网页中的内容写入进文件中,注意,不要写入笔记中的内容,还是写入网页中的内容
[root@web-server-08 wordpress]# vim wp-config.php

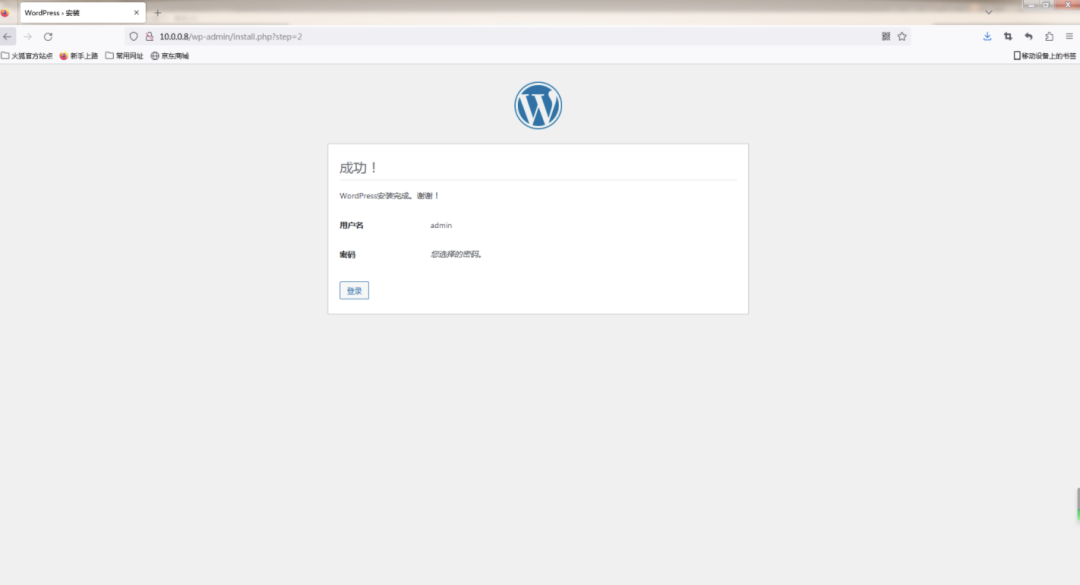
点击登录,进入wordpress!


到此,wordpress部署完成。
 本文经授权发布,不代表老男孩教育立场。如若转载请联系原作者。


 扫码加入Python学院讨论学习群
 最新文章
最新文章