老男孩教育专注IT教育10余年,只培养IT技术精英
 全国免费咨询电话(渠道合作):400-609-2893


【linux运维培训】nginx 虚拟主机介绍与配置!
 老男孩IT教育
 技术博客
技术博客
 2022年11月23日 14:09
所谓一个虚拟主机,在Web服务里就是一个独立的网站站点,这个站点对应独立的域名(也可能是IP或端口),具有独立的程序及资源目录,可以独立地对外提供服务供用户访问。
- Nginx 虚拟主机的介绍
- Nginx 客户端访问流程
- Nginx 虚拟主机的部署
- Nginx 虚拟主机多实例
- Nginx 常用模块的介绍
什么是虚拟主机
虚拟主机概念:所谓一个虚拟主机,在Web服务里就是一个独立的网站站点,这个站点对应独立的域名(也可能是IP或端口),具有独立的程序及资源目录,可以独立地对外提供服务供用户访问
一台服务器里,或者一个nginx里怎么能提供这么多域名服务呢?
首页
一套集群 www.jd.com
二级页:
一套集群 diannao.jd.comchannel.jd.com
内容页:
一套集群 https://item.jd.com/50760357152.html
订单页:
一套支付页集群
一套物流跟踪集群
一套评价页面集群
apache虚拟主机包含在 内,而Nginx软件则使用一个 server{}标签来标示一个虚拟主机

为什么要用虚拟主机
1、一个nginx主进程,指定一个配置文件,配置文件里有多个虚拟主机。
2、如果不用虚拟主机,一个diannao.jd.com就要对应一个服务器,浪费
3、多实例:多个nginx主进程,每个nginx进程,指定不同的配置文件(目录、代码、域名也不同)
虚拟机主机分类
1)基于【域名】的虚拟主机
以不同的多个域名区分不同的虚拟主机,放在一个nginx服务上,还能够让用户有序访问 生产用途:企业提供正常网站服务
2)基于【端口】的虚拟主机
以不同的端口,来区分多个虚拟主机,肯定也是放在一个nginx服务上,还能够让用户有序访问
生产用途:
不对外提供访问的服务,网站的后台,测试环境
各种应用,API接口(10.0.0.7:8091)
所有网站也用特殊端口,前端有负载均衡(80),负载均衡下面的节点是什么端口无所谓
好的思路:后台单独用开启web服务器
不做域名解析
不用80端口
不配公网IP
VPN拨号,内网访问
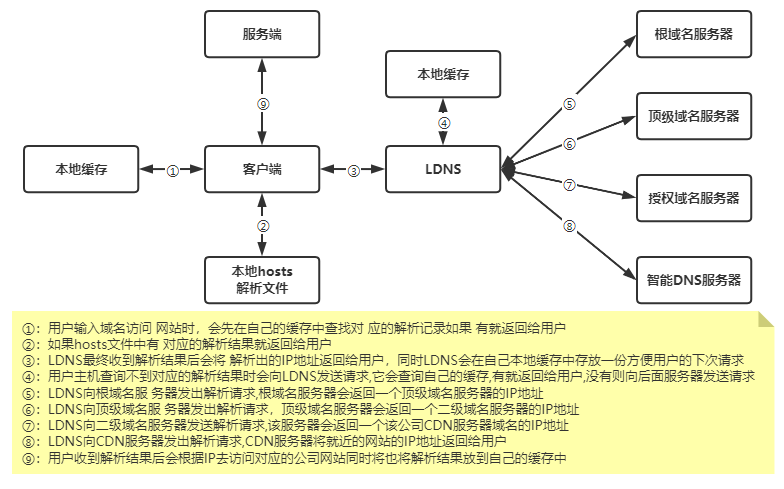
客户端访问流程
基于域名的虚拟主机配置
| 系统环境

| 配置主配置文件
# cd /application/nginx/conf

# cat nginx.conf

worker_processes  1;

events {

  worker_connections  1024;

}

http {

  include       mime.types;

  default_type application/octet-stream;

  sendfile       on;

  keepalive_timeout  65;

  include /application/nginx/conf/extra/*.conf;

}
| 配置虚拟主机路径及配置文件
第一个配置文件
# mkdir /application/nginx/conf/extra/

# vim /application/nginx/conf/extra/01_www.etiantian.org.conf

server {

      listen       80;

      server_name www.etiantian.org;

      location / {

          root   html/www;

          index index.html index.htm;

      }

}
第二个配置文件
# vim /application/nginx/conf/extra/02_blog.etiantian.org.conf

server {

  listen       80;

  server_name blog.etiantian.org;

  location / {

      root   html/blog;

      index index.html index.htm;

  }

}
第三个配置文件
# vim /application/nginx/conf/extra/03_bbs.etiantian.org.conf

server {

  listen       80;

  server_name bbs.etiantian.org;

  location / {

      root   html/bbs;

      index index.html index.htm;

  }

}
| 创建虚拟主机站点目录
# cd /application/nginx/html

# mkdir www blog bbs

# echo "www" >www/index.html

# echo "blog" >blog/index.html

# echo "bbs" >bbs/index.html
| 检查语法重启服务
nginx -t

nginx -s reload
| 配置Linux hosts并访问
# tail -1 /etc/hosts

10.0.0.7 www.etiantian.org blog.etiantian.org bbs.etiantian.org
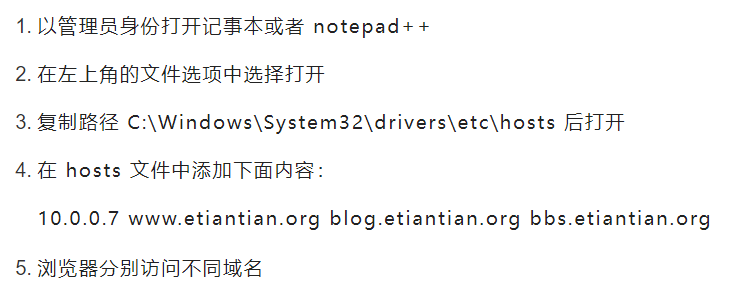
| 配置windows hosts并访问
基于端口的虚拟主机配置
| 配置虚拟主机
# vim /application/nginx/conf/extra/01_www.etiantian.org.conf

server {

      listen       80;

      server_name www.etiantian.org;

      location / {

          root   html/www;

          index index.html index.htm;

      }

}

# vim /application/nginx/conf/extra/02_blog.etiantian.org.conf

server {

  listen       81;

  server_name blog.etiantian.org;

  location / {

      root   html/blog;

      index index.html index.htm;

  }

}

# vim /application/nginx/conf/extra/03_bbs.etiantian.org.conf

server {

  listen       82;

  server_name bbs.etiantian.org;

  location / {

      root   html/bbs;

      index index.html index.htm;

  }

}
| 检查语法并重启
nginx -t

nginx -s reload
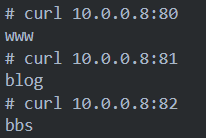
| 通过IP地址加端口访问网站
基于【IP】的虚拟主机配置
| 配置多个IP
ifconfig eth0:9 10.0.0.9/24 up

ifconfig eth0:10 10.0.0.10/24 up

ip addr add 10.0.0.11/24 dev eth0 lable eth0:11
| 配置虚拟主机文件
# vim /application/nginx/conf/extra/01_www.etiantian.org.conf

server {

      listen       10.0.0.9:80;

      server_name  10.0.0.9;

      location / {

          root   html/www;

          index index.html index.htm;

      }

}

# vim /application/nginx/conf/extra/02_blog.etiantian.org.conf

server {

  listen       10.0.0.10:80;

  server_name  10.0.0.10;

  location / {

      root   html/blog;

      index index.html index.htm;

  }

}

# vim /application/nginx/conf/extra/03_bbs.etiantian.org.conf

server {

  listen       10.0.0.11:80;

  server_name  10.0.0.11;

  location / {

      root   html/bbs;

      index index.html index.htm;

  }

}
| 检查语法并重启
nginx -t

pkill nginx

nginx
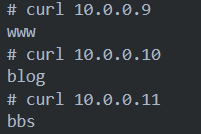
| 通过辅助IP访问nginx
nginx多实例部署
| 添加两个普通用户并设置密码
useradd blog

useradd bbs

echo 123456|passwd --stdin blog

echo 123456|passwd --stdin bbs
| 在不同的用户家目录下面创建各种目录
# cd /home/blog/

# mkdir conf/extra log html -p

# tree

├── conf      #主配置文件目录

│   └── extra #虚拟主机目录

├── html      #bbs站点目录

└── logs      #日志目录

或者直接拷贝

# cp -a /application/nginx/{conf,logs,html} /home/blog

# cp -a /application/nginx/{conf,logs,html} /home/bbs
| bl
利用普通用户权限将不同业务进行彻底分离管理
1)配置nginx配置文件
# ls -ld /home/zuma

drwx------ 5 blog blog 114 7月  15 16:29 /home/blog

# su - zuma

$ tree

.

├── conf

│   ├── extra

│   │   └── 01_www.etiantian.org.conf

│   └── nginx.conf

├── html

│   ├── 50x.html

│   └── index.html

└── logs

  ├── access.log

  ├── error.log

  └── nginx.pid


主配置(注意路径)

$ cat /home/blog/conf/nginx.conf

user blog;

worker_processes  1;

events {

  worker_connections  1024;

}

error_log /home/blog/logs/error.log warn;

pid /home/blog/logs/nginx.pid;

http {

  include       mime.types;

  default_type application/octet-stream;

  sendfile       on;

  keepalive_timeout  65;

  log_format main  '$remote_addr - $remote_user [$time_local] "$request" '

                     '$status $body_bytes_sent "$http_referer" '

                     '"$http_user_agent" "$http_x_forwarded_for"';

  include /home/blog/conf/extra/*.conf;

}


#虚拟主机配置(注意路径)

$ vim /home/blog/conf/extra/01_www.etiantian.org.conf

server {

  listen       8081;

  server_name www.etiantian.org;

  location / {

      root   /home/blog/html;

      index index.html index.htm;

  }

access_log /home/blog/logs/access.log main;

}

$ cat /home/blog/html/index.html

blog
2)检查语法
$ /application/nginx/sbin/nginx -c /home/blog/conf/nginx.conf -t

nginx: [alert] could not open error log file: open() "/application/nginx-1.20.1//logs/error.log" failed (13: Permission denied)

2021/07/15 16:21:10 [warn] 1702#0: the "user" directive makes sense only if the master process runs with super-user privileges, ignored in /home/blog/conf/nginx.conf:1

nginx: the configuration file /home/blog/conf/nginx.conf syntax is ok

nginx: configuration file /home/blog/conf/nginx.conf test is successful

特别提示:[warn] [alert] 并非错误,可以忽略
3)启动并检查
$ /application/nginx/sbin/nginx -c /home/blog/conf/nginx.conf &>/dev/null

$ lsof -i :8081

COMMAND PID USER   FD   TYPE DEVICE SIZE/OFF NODE NAME

nginx   1705 blog   5u IPv4  27729     0t0 TCP *:tproxy (LISTEN)

nginx   1706 blog   5u IPv4  27729     0t0 TCP *:tproxy (LISTEN)
4)配置/etc/hosts解析,并访问
$ curl www.etiantian.org:8081

blog
由于文章内容篇幅过长,特将文章分开发布,其余内容见文章链接:https://www.oldboyedu.com/blog/4691.html
 本文经授权发布,不代表老男孩教育立场。如若转载请联系原作者。


 扫码加入Python学院讨论学习群
 最新文章
最新文章